Samsung WB600 – 12.2MP, 15x super-zoom, 720p HD at Rs. 19,900 Review
The Samsung WB600 promises to be a good mid-range camera with a feature-rich configuration. Although, its performance is quite disappointing in spite of the heavy hardware configuration and leaves a lot to be desired for a performance hungry user. The price is on the high side, and there are a bunch of options from the likes of Nikon and Canon that would provide more bang for buck.
Samsung WB600 is the industry’s first digital compact camera to combine a 24mm ultra-wide angle lens with 15x super-zoom control. It incorporates a 14.2 megapixel CCD image sensor that adopts a point and shoot mechanism. Built with a 3-inch LCD display incorporating intelligent brightness technology, it automatically adjusts itself to the ambient light conditions for optimal viewing. Adding support for 720p HD video recording at a decent 30 fps (frames per second), it produces high quality videos in H.264 format and allows the user to hook up the camera to a HDTV using the HDMI interface. Encompassing a wide array of impressive features like Smart Auto, Face Detection, Smile Shot, Blink Detection, Self Portrait and Beauty Shot, it promotes digital compact cameras to the next level.
Build quality & dimensions
Samsung WB600 is built with a robust plastic material and decorated with chromium metallic finish across the body frame covering the top and side edges. The body contours are elegantly sculpted, with an outward body curve marking the right-hand thumb grip for holding the camera steady while shooting stills and videos. The camera is very sleek and trendy, aptly fitting the dimensions for a digital compact camera and hardly weighs about 200grams.
Ergonomics
The control pad buttons are lined across the body curvature beside the LCD screen, with an ok button at the centre. Scattered around the control dial, are the menu, video playback and function buttons arranged in the dot-triangle form. Also, there is a video recording button at the far right corner of the LCD screen, slightly popping out of the curvature making an out-dent. At the top of the camera, there is a wide array of chunky controls sprinkled across the chromium plate, that adds glamour & style to the camera. Starting at the left, it includes a twin set of holes meant for stereo sound recording system and an indented power button located between them, which glows dazzling blue when turned on. Just to the right of it, is the scene mode selection dial control, followed by the tele-wide angle zoom control switch. Moving to the front of the camera, we see a thick chromium plated circular strip surrounding a plastic shutter acting as the lens cover, when not in use. There is a small port hole beside the lens cover, that houses the AF assist/self timer lamp, and a 9 hole microphone indentation placed at the bottom beside the lens cover. Due to the wide circumference of the large lens while on operation, the built-in flash unit has been moved to the right corner on the front face of the camera. Finally, exploring the bottom face of the camera, we find a tripod mount porthole located at the centre and a latch door controlled battery/memory card compartment located right next to it. Although, the navigation controls and camera controls are intuitively organized for quick access, the menu system could have been much more simple for the first time user. Most options are not easily revealed at first glance, unless the user is prepared to delve deeper exploring the various manual and program settings.
Read all about the Features and functionality of the Samsung WB600 in the next page…
Features and functionality
Samsung WB600 provides a wide-array of shooting modes and scene selection modes, with the use of a single dial control. They are as follows:
1) Dual Image Stabilization mode which includes optical and ISO boosting digital image stabilization.
2) Beauty shot mode which comes in handy for removing inherent spots and blemishes while processing the subject’s face during a snapshot.
3) Scene selection mode which allows the user to select the type of scene, based on the shooting scenario and ambient conditions. For example: ‘Night’, ‘Portrait’, ‘Children’, ‘Landscape’, ‘sunset’, ‘dawn’ and ‘backlight’.
4) Movie mode which allows the user to capture videos in 720p HD at a maximum resolution of 1280×720 running at 30fps. For a non-HD video, the user can capture videos at lower resolutions like 640×480 or 320×240 running at 15fps (by reducing the frame rates using the “Fn” button at the rear of the camera)
5) Smart Auto mode which automatically optimizes the camera settings and selects the most appropriate scene mode for reproducing high quality & crisp images. This mode mirrors the functionality of intelligent auto mode adopted by the likes of Panasonic, Sony and Canon on their digital cameras.
6) Auto mode allows the user to take snapshots with the factory default settings or the basic settings predefined on the camera. This mode is most suitable for close range shots in good lighting conditions, as it does not require tinkering with the settings.
7) Program mode allows the user to fine tune the preset basic settings to enhance image sharpness and focus.
8) ASM (Aperture Shutter Manual) mode is meant for the expert users to tinker with the aperture size, shutter speed and manual mode settings.
In addition, it has a tele-wide control switch at the top of the camera, that hardly takes about 5 seconds to switch the mode of transition from tele to wide functionality. The 4-way operational control pad is located right next to the LCD screen at the rear of the camera, which controls the navigation and special functions such as flash (on/off), timer (Off, 2 secs, 10 secs, motion timer), macro and display mode (basic, detailed photo information, full photographic information). The basic mode only displays the battery life status and the number of snaps that can be taken before the memory becomes full. The detailed and full photographic mode show the status of special functions like flash, timer, macro, image stabilization etc. It is to be noted that Smart Auto mode disables access to various fine settings like ISO, EV, white balance, face detection and Smart FR, as these settings are automatically controlled by the camera in this mode of operation.
Read about the various types of camera settings we used for tweaking the camera in the next page…
Flash settings:( Off, Red-Eye fix, Slow Sync, Fill in, Red-Eye, Auto)
Red-Eye fix – used to remove red eye from the subject’s photo.
Slow sync – used to illuminate both the subject and the background uniformly.
Fill in – activates always flash on.
Red-Eye – reduces red-eye effect
Auto – automatically chooses the appropriate flash settings based on ambient light conditions
Timer settings: (Off, 2secs, 10secs, motion timer)
The timer can be set to open the shutter after 2 seconds, 10 seconds or after specific period of time when the subject has ceased to move (say after 6 seconds).
Macro settings: ( Off, Macro, Normal(AF))
The macro setting can be set to off, for taking long range shots or set to on for close range shots within 80 cm distance from the reference subject or set to Normal (Auto Focus) for shots taken beyond 80cm distance from the reference subject.
Bundled accessories
One battery, 1GB microSD memory card, one strap, one USB/power adapter cable and one AV cable.
Read on to know, how we tested the camera across various parameters & benchmarks for performance in the next page…
How We Tested
We took various snaps both indoors and outdoors, with the settings mode set to “Auto”, image size set to 4000×3000 (pixels), resolution set to 96dpi, ISO speed set to ISO-200, exposure program set to “normal” and metering mode set to “pattern”. However, the settings mode was set to “Program” and the metering mode was set to “spot” during the ISO test.
1) Indoor photo test (with & without flash)
We took several snaps in the indoor photo test to evaluate the image sharpness, brightness & contrast levels, crispness of colours and intensity of sensor noise that mirrored particle grains & blurriness.
We divided this test into three parts namely:
a) Bright indoor with flash (one tubelight was turned on)
b) Bright indoor without flash (one tubelight was turned on)
c) Dark indoor with flash (the tubelight was turned off)
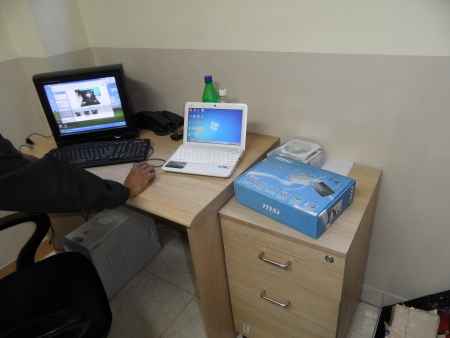
In the bright indoor test with flash, there were darker shadows in the background, but the image clarity was good and the colours looked crisp with an unwavering brightness contributing to the image sharpness. Overall, the images delivered satisfying results in this test.
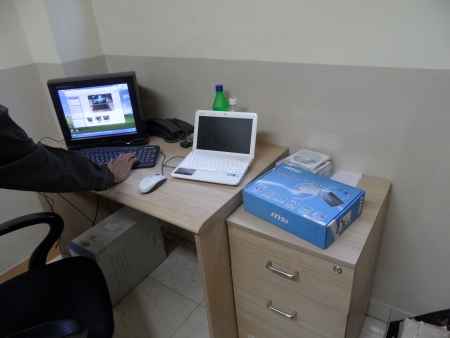
In the bright indoor test without flash, the shadows looked lighter and faded. At the same time, the image sharpness, colour crispness and brightness levels took a nose dive, resulting in faded and dull images. Even the skin colour took white visible patches on it, apparently indicating poor colour resolution. Overall, the images were not up to the mark in this test.
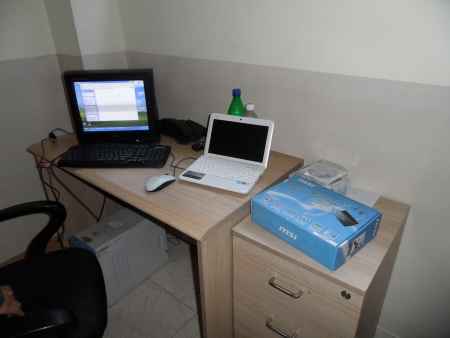
Finally, the dark indoor test with flash sprung up a few surprises. There were hardly any visible shadows in the background with due credits to diminishing brightness levels compared to the previous tests. Also the image clarity, colour crispness looked really good in spite of the low light conditions in the room.
2) Font image test (with & without flash)
We took a few snapshots of the netbook white-chiclet keyboard in this test, to evaluate the font image sharpness, colour crispness and the brightness levels or luminosity which is a prominent factor in determining the image sharpness and colour crispness. We had one tube-light turned on to enable optimum light conditions for the test.
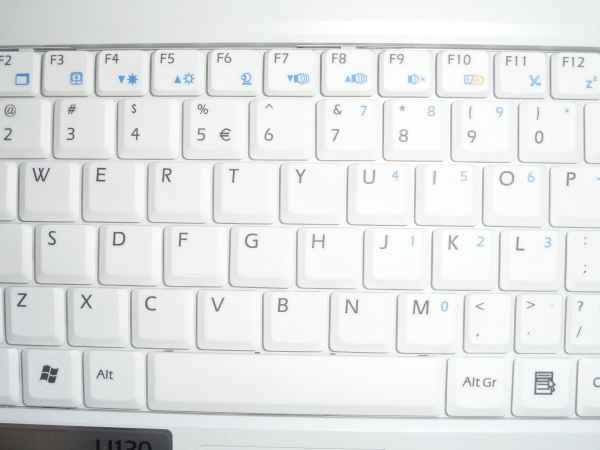
In the font image test with flash, we observed that the font images looked slightly faded in some areas, due to light reflections on the white keyboard. Although, boosted with optimum luminosity, it even revealed the finer details of special character fonts. Overall, this test yielded satisfactory results.
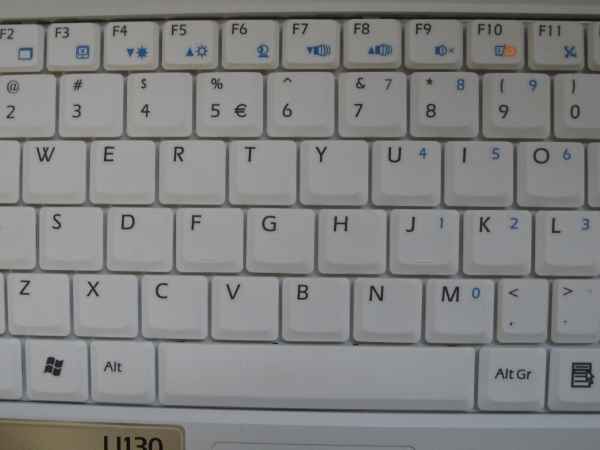
In the font image test without flash, we observed that the font images looked much sharper and crisper with due credits to non-existent light reflections from the keyboard in this test. This test scored full marks revealing the finer details of special character fonts with optimum sharpness.
Overall, the camera passed the font image test with satisfactory results.
Read all about the Macro test, ISO test, Outdoor photo test and more in the next page….
3) Macro test
In the macro test, the images delivered optimum clarity and colour crispness, along with good depth of field. In fact, we observed that macro mode is the strongest selling point of this camera. It did extremely well in delivering stunning images in the macro mode. We have shared a macro snapshot for your reference in this review.

4) ISO test
In the ISO test, we evaluated the camera for its image sensitivity, colour crispness and brightness levels across various ISO settings ranging from ISO-80 to ISO-3200. We checked for sensor noise and particle grains during this test. The camera revealed a spike in sensor noise at ISO-200 and went up considerably higher at ISO-800 and above. The effects of sensor noise manifested itself in the form of visible artifacts and grainy particles at ISO levels higher than ISO-200. Also, the sensor noise resulted in blurriness of image and reduced image clarity. The image blurriness and grainy particles hit their peak at ISO-3200, while the camera delivered the best image quality at ISO-80 and ISO-100 settings.
Overall, the camera did a fair job with an average performance in this test.


.jpg)
.jpg)

5) Outdoor photo test (without flash)
In the outdoor photo test, the camera had a decent outing in terms of image focus, image clarity and colour crispness. Although, it failed to take clear snaps from a moving vehicle, it yielded average results with snaps taken at stationary position. Overall, it is a decent camera for short range snaps and performed poorly while focusing distant objects in the outdoor ambient conditions. Hence, the lack of depth of field became very evident in this test. To sum up, the overall results of the test was not satisfactory and the shortcomings reflected in average image clarity and focus.

6) Tele-Wide test (with flash)
In the Tele-Wide test, the photo was taken with the flash on and well lit ambient conditions. The photos delivered extremely good colour crispness, optimum image clarity, decent brightness levels and good depth of field. Overall, the camera passed this test with very satisfactory results.
.jpg)
.jpg)
7) Shades & colour test (with flash)
In the shades and colour test, we took several snaps of different shaded & coloured bottles. We evaluated the pictures for colour depth, colour crispness and overall image clarity, while taking into account how close the colours in the picture match with the true colours perceived by our naked eyes. We observed that the camera did a fair job in recognizing finer details of various shades and colours. It also reproduced decent image clarity, good colour depth & colour crispness of the bottle images, while revealing the super-fine details of the loose fabric strands that lay strewn on the green carpet used for the setup. Overall, the camera delivered very satisfactory results with high colour resolution and consistent image clarity throughout the test.
To view the detailed specifications of the digital camera, click here.
Note: Click on the image gallery pictures to view the shades & colour test images
Our Ratings
| Features | 8 |
| Performance | 6 |
| Build quality | 7 |
| Value for money | 6 |
| Overall | 7 |
