Google has added new email layouts for your Gmail: How to use it

Google has introduced a new set of email layouts for Gmail.
The email feature is only available on Google Workspace editions.
Users can add logos, personalize colors, fonts, images, and more with the new layouts.
Google is regularly adding new features to its free email service Gmail. Earlier this month, Google introduced a new feature allowing users to send emails without using the internet via Google Chrome. The search engine giant is now launching customized layouts to transform email messages from plain and standard to attractive and eye-catching. The feature allows personalization of the email interface by following a few simple steps. For example, you can choose the predetermined layout or add logos and customize your emails' colors, fonts, and images to match your branding or company.
The option is currently only available for Google Workspace users operating via the web, i.e., people who are directly paying or are members of an organization that subscribes to Workspace account. However, even the non Workspace users can access the feature by installing third-party plug-ins to Gmail, and this will provide them with various email templates that the user can modify as per their requirements.
How To Use The New Gmail Feature
1. Open Gmail in your web browser, and click Compose to start writing a new email.
2. Next, you'll see the layouts button, which looks like a subdivided rectangle toward the end of the icons row next to the Send button.
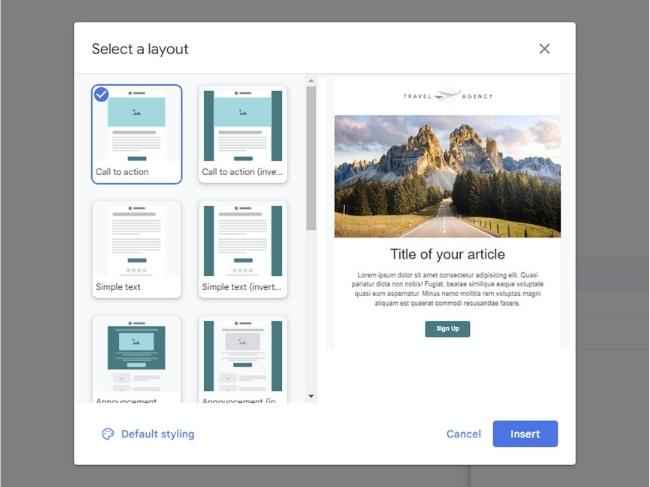
3. Click it to open the layout gallery, where many templates combine images, text, and other elements.
4. Choose your thumbnails, and a preview will display on the right.
5. Once you find a layout, click on Default styling to customize the template.
6. Now, you can drop in your logo, select your email's primary font, and adjust the color palette; when you pick the main one, Gmail will choose a few others to match.
7. Next, use Footer details to enter a name and address at the bottom of the email, and via Links, you can add some social media URLs.
8. Click Save changes to confirm your customized layout and select Insert to drop the template into the email you're composing. Once the layout is applied, you can edit the text, and the images like you do in any other email (click on a picture and pick Change image, for example, to swap it out for something else). You can also remove a section from your template by selecting the part you want to eliminate.
All the other functions of the email compose interface will work as usual. Use the full-screen button (two arrows, top right) to add more space to the layout, and click on Send when the email is ready. If you want to ditch the changes you've made and start fresh with a new template, click on the customized layouts button again and start over.
For more technology news, product reviews, sci-tech features and updates, keep reading Digit.in.
Shivam Tiwari
Shivam has been reporting technology-related stories for Digit. He is demonstrating his skill sets in the news sector. View Full Profile


