Give your precious photos a professional touch with Gimp, a comprehensive image editing tool.
It’s the holidays! Besides gifts, that means boatloads of photographs. In case you want to give a professional finish to the photographs, but don’t want to sell your kidney to get the software, Gimp comes to your rescue. It gives the other biggies in the segment a run for their money. With loads of functionality and customisations up for grabs. Here are a few tricks to make your life easier.
Batch process your images with Gimp
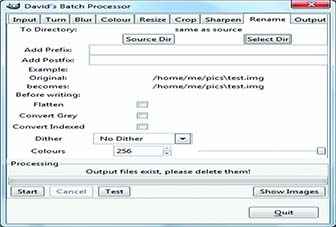
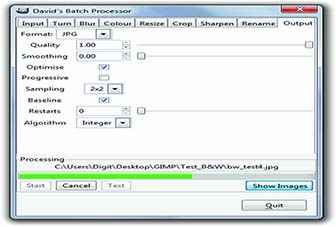
Gimp doesn’t have batch processing built into the core software. A simple batch processing plug-in DBP (David’s Batch Processor) allows the user to automatically perform operations (such as resize, blur, sharpen) on a collection of image files. This plug-in is included in this months Alpha DVD. Just copy the executable file and place it under GIMP_INSTALLATION_FOLDERlibgimp2.0plug-ins. Now restart Gimp. You’ll find Batch Processing listed in the Filters menu. Clicking on Batch Processing will bring up the DBP dialog box. The mechanics are simple, each tab stands for one operation — select input files, enable the operations you’d like to perform and fine-tune the respective settings. Select output file type and parameters and you’re done. There’s one catch here though, the default directory for output is same as the current working directory, hence you’ll have to change the output directory with the “Select Dir” button in the Rename tab.
Colour correction of photos with Gimp
Many times, you’ll come across an image with a colour cast i.e. the picture is evenly affected by a tint of a particular colour. One of the main problems in dealing with such photographs is that we don’t know which colour to correct.
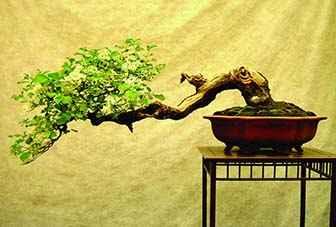
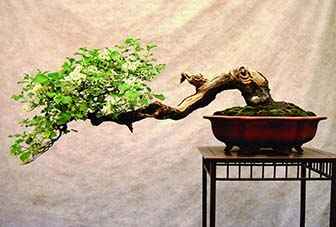
One of the solution is to target an area of the image that should be white (but isn’t), for example, the white of the eyes or a wall which should be white. If there aren’t any white areas in the image take the most neutral (grey) area of the image and in case you have no grey areas, go with the actual color values, for instance skin tone should be a balanced magenta and yellow with cyan being 10-15 per cent of that value.
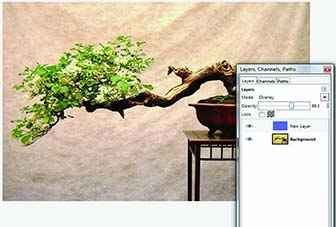
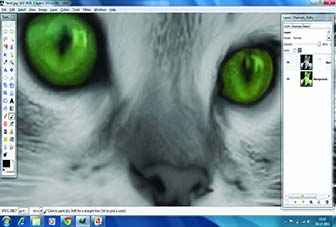
Select the Color Picker Tool (O) and click the area which should be white but isn’t. In our case, it’s the flowers that should be white. Now, click on the Foreground Color box to get the color selection dialog. Here, set the Saturation(S) to 100 and Value(V) to 60. Create a new layer and fill it with foreground color. With the new layer selected go to Color > Invert. Once this is done change its blend mode to Overlay. We’re not quite done yet. You’ll get another color cast, in this case the photo has acquired a bluish tinge. To counter this, lower the opacity of the foreground color layer till you get desired result. The value of opacity depends on the image you’re working on.
Note that this method quickly removes color casts but it isn’t the only way to colour correct over all channels. Use Levels and Curves for better control and more effective color correction.
Instagram plugin for Gimp?
Named App of the Year for 2011 by Apple, Instagram lets you apply filters to photographs and publish them to social networks. Gimp plug-ins (akin to Photoshop actions) make your photos look as if they were processed by Instagram.
Two of the more famous filters are Lomo and Vintage. You will find these two and many other plug-ins in this months Alpha DVD. To install them first find the folder where plug-ins are stored. You can find this folder by navigating to Edit > Preferences > Folders > Scripts. Once the folder is identified, just place .scm plug-in file from the DVD into that folder. Refresh the script library by going to Filters > Script-Fu > Refresh Scripts and you’re done.
You’ll find the plug-in(s) listed under the Filters menu. Once installed, Lomo can be applied by navigating toFilters > Light and Shadow > Lomo… and Vintage is found at Filters > Artistic > Vintage Look. On selecting the menu item a dialog will pop up letting you control some aspects of the scripts, you’ll need to experiment with different settings to get the desired result. Doing this manually will take some effort, but the end result makes the effort worth it. You can find more plug-ins and add-ons at goo.gl/uFgOm.
 Selective colourisation with Gimp
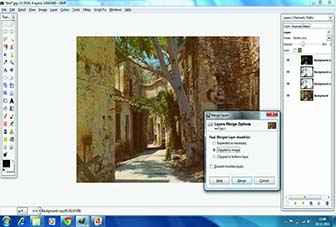
If you fancy yourself to be the next Steven Spielberg this technique holds the key. In selective colorisation the photograph is almost entirely converted to black and white, but some parts are left in color for a dramatic effect. To achieve this, duplicate the image layer, by clicking on the Duplicate button in the Layers window. De-saturate the duplicate layer, by going to Colors > Desaturate.. and select “Average” for converting that layer to black and white.
In the Layers window, right-click on the B&W layer and select “Add Layer Mask”. In the Add Mask Options dialog, select White (Full Opacity). Now, select the Brush tool, making sure that the foreground colour is black. Select a large brush size and start painting the interior of the parts you want to be coloured. Zoom in when you reach the edge, select a smaller brush with feather for the fringes. Double-check to see if you’ve left out any part. And Voila! you are done.
Hassle-free HDR images with Gimp
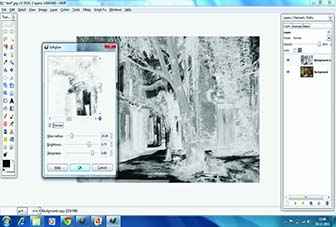
HDRI stands for High Dynamic Range Imagery, which essentially is a set of techniques allowing a greater dynamic range between the brightest and darkest areas of the image. Normally, such images are computer renderings, or multiple low dynamic range (LDR) images merged into one.
It’s easy to emulate this effect in Gimp, without the headache of merging multiple files followed by tone-mapping. Firstly, install the Dodge and Burn plug-in bundled with this months Alpha DVD. Before you go all out on converting the image to an HDR one, adjust the brightness and contrast to your liking. In case you’re confused about the best way to do this just run Colors > Auto > Whitebalace.
.jpg)
 HDR glory(1).jpg)
Now duplicate this layer and set that layers opacity to 75 per cent. Duplicate the original image layer, and bring it on top of all other layers. Go to Colors > Levels, and set the black point in the dialog to 100. The image should now become darker. Change this darker layer’s blend mode to “Dark only” and set this layer’s opacity between 30 to 50 per cent depending on the image. Right-click on the top-most layer and select “Merge Visible Layers”, in the dialog that follows, select “Clipped to image”. Now run the Dodge and Burn plug-in, you’ll find it under Script-fu > Enhance > Dodge and burn. In the dialog that follows set Thin to 10 and Thick to 25 (though these values are dependent on the picture, you’ll need to experiment with this tool to get the desired result). Once this is done select the image layer (you’ll get two additional layers called Dodge channel and Burn channel) go to Colors > Hue-Saturation, and set the saturation to 50. Next go to Colors > Levels and set the black point to 25. Thats it, you just got
your faux HDR image.