How to print better photos
Use these tricks to improve the output quality from your photo printer

Photo printers for consumers predominantly run on inkjet technology. Laser printers are catching up but they haven’t yet matched the best inkjet printer’s print quality. But once you get past the buying conundrum and finally purchase a brand new photo printer, how do you ensure it performs optimally and gives you the best quality of photo prints? For an occasional and infrequent user of photo printers who prints an album once or twice a year, here’s how you can get the most out of your printer and the features it supports.
 Survey
Explore the printer’s driver in detail
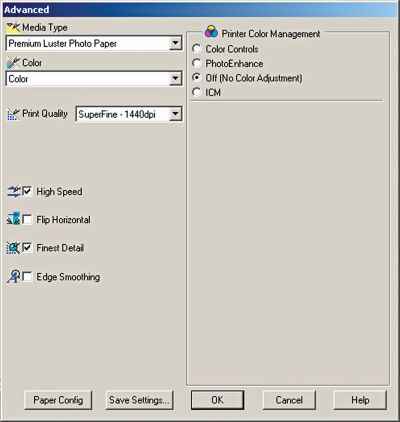
The greatest mistake you would ever do is to buy a dedicated photo printer and not look through its driver settings. Part of the printer’s setup process is its driver installation, which you either do over the web or through the printer’s installation disc (check the printer’s box contents carefully). After installing your printer’s appropriate driver, ensure that you take a good look at it.
Printers have an advanced settings options that shouldn’t be ignored
Right click on your default printer in the Control Panel to launch a dialog box. Take note that you can click on various tabs like Layout, Page Quality, Colors and Color Quality within the dialog box. What they reveal are features that control the performance of the printer extensively. Most users don’t know that much of the photo prints’ quality is decided by what radio buttons are checked or unchecked under the settings of the various tabs under the dialog box. For example, under one of those driver tabs, if you look up the setting for graphic or print quality, difference between a 300 x 300 dpi and 72 x 72 dpi print will be quite a bit. Feel free to play and tinker with these settings and figure out what works best for your printing needs. For instance, web prints are generally made at 72 dpi, while our magazine images are printed at a higher 300 dpi image quality. Also one of the most common oversight prevalent among photo printer users is to not check whether they’ve selected the correct paper type in the printer’s settings.
Print directly off an SD card or a USB drive
Some photo printers come with an SD card reader slot, which allows you to quickly insert your digital camera’s SD card and print photos off it directly without transferring them to the connected computer. If you’ve never tried out this option before, please do so before that SD card slot on your printer lies forgotten in a heap of dust. Compare the quality of photo prints of the same image but taken via a PC and the SD card directly. Sometimes, and there’s no telling this for sure, but you may notice that prints of photos taken directly off the SD card may actually be better than those when taken off a PC. The same logic holds true for printers that allow connecting to a camera via PictBridge or through USB and directly printing photos from it, without having to transfer the lot onto a computer. Try this a few times and arrive at your own conclusion.
Choose the right paper
A big factor seldom considered while taking precious photo prints is the quality of paper used, and whether it’s the right one for the job. Most photo printers come with their own recommendations as to what type of paper is best suitable for taking photo prints. The type of paper not only determines the quality of the print but also its longevity – how far will the photo print last exactly as it was the day it got printed? Various types of paper are available in the market – glossy, semi-glossy, plain, etc. – and the decision you have to make is which best fits with your printer’s output.
Printing paper quality matters
Check with the user guide or your printer manufacturer’s website to find out which paper it recommends for best quality photo print jobs. Also remember that to get the best quality photo prints, you will have to buy the best quality paper, which is often quite expensive.
Don’t ignore onboard auto-fix
Most dedicated photo printers these days come with some sort of autofix feature, either as a dedicated button on its body or through a bundled software utility. All we have to say regarding these features and software is that don’t ignore them. Definitely give them a try, as you never know what trick you may be missing out on.
Auto-fix features found on most photo printers analyze the shot image and apply corrective measures to fix its attributes like brightness, contrast, red-eye reduction, gamma levels, etc. Compare the quality of prints taken with your printer’s autofix feature enabled against the photos when it was disabled and see for yourself which effect you like the most.
Printing via third-party photo software
Earlier in the article we highlighted the importance of printing directly via a camera’s SD card or applying a one-click auto-fix to correct your images before printing them. In an opposite tangent, we also recommend the use of third-party photo tools which can go a long way in enhancing your printed photos quality.
An app like Pixlr has some interesting options for you to try
Professional tools like Adobe Photoshop or GIMP are excellent for determining and controlling every minute attribute of a photo. They offer great depth in manipulating and controlling even the smallest aspect of a photo, therefore letting you have the prints you desire to the T. In this case, the features and degree of manipulation offered by these advanced photo editing tools far exceeds the simple, one-click auto-fix solution built into the printers. Even Google Picasa and Irfanview let you tweak and edit your image to a certain degree, and there’s no harm in investing some time in them. If you’re looking at an online photo editor, Pixlr is one of the best we’ve come across. In your quest towards printing great quality photos, you should definitely dedicate some time to learning the ropes of a photo software.


.jpg)