How to perform a clean install of Windows easily
Thinking of reinstalling Windows on your PC or laptop? Here's how you can prepare for and perform a clean install of Windows efficiently.
Remember the sweet plasticky smell of your freshly unpacked computer? How it smoothly turned on, and seamlessly took you to your gloriously plain desktop? Not that it’s necessarily a worthless piece of junk now, but power users who crack software and generally experiment with new and innovative uses of software end up visiting hundreds of infected web pages which inadvertently infect their own PCs no matter how protected or careful they are. Even if you don’t live on the edge, years of bloat start showing sometime down the line.
What you need, on occasion, is a reset button that takes your PC back to a state when it was on its best behaviour.
Clean installs are almost a must for those who like keeping their systems smooth and infection-free – much like one would do a regular tune-up of their vehicles – to keep the bugs and glitches away. We obviously don’t recommend a monthly full system clean-up, but once a year or every few years, “just to be safe” isn’t a bad thing to plan for. All you need to do is back up all that data and do a clean install of Windows. Here are some things to keep in mind before you do either.
Back up your data
Unless you’re one of those obsessive compulsive techies who arranges his stuff meticulously down to the last .txt file, your data is probably all over the place, in folders labelled ‘to sort out’ and ‘more stuff to sort’ or maybe in Leet codes and hidden directories among your system files. And unless you have an eidetic memory, it’s more than likely that you’ll miss one of these ‘important folders’. Think hard, and remember to back up your data, especially little things such as saved passwords, auto-fill data from browsers, Windows sticky notes (yes there’s a way to back that up as well. Read further and see our checklist to know more), etc.
Use System Restore Points
Windows System Restore points are meant to be used in case of extreme situations. However, don’t avoid the feature either; use it well.
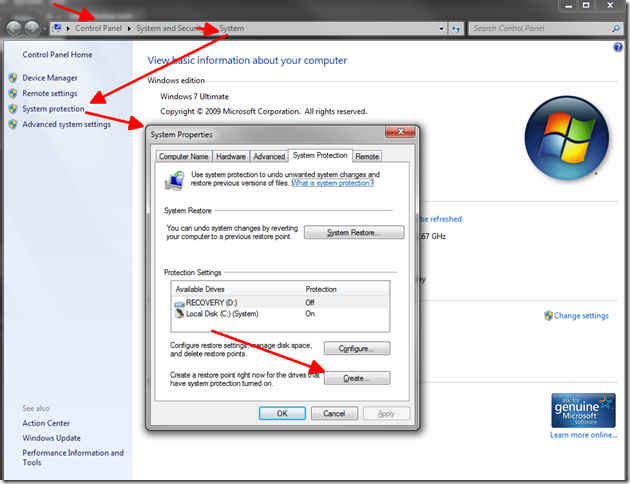
To create a system restore point, go to Control Panel > System > click ‘System Protection’ on the left-hand side pane > System
Restore.
You may need Administrator permission for which you may need a password. Enter this and then click on ‘Create’. On the System Protection dialog box that pops up, type out a description to make it easier for you to find the restore point, and then click ‘Create’. To restore this point in the future, run the ‘System Restore’ option on the same tab and select your saved point.
The System Restore option usually comes in handy at times when you accidentally install software that starts playing havoc with your PC, or refuses to uninstall because of corrupt files. The option leaves your files and folders intact, so now worries. All the drivers installed at the time the restore point was set will also stay where they’re supposed to be.
Clonezilla
Too lazy to pick out your folders and save the necessary ones? Clonezilla to the rescue! It’s a software for people who are ready to prepare themselves for a probable crash. Sure, you can do a clean boot and reinstall Windows, taking away any and every system problem you may have with your PC. But at the end of the day, you’d obviously prefer a clean system with all the essential and basic software intact. To do so, follow the instructions given below.
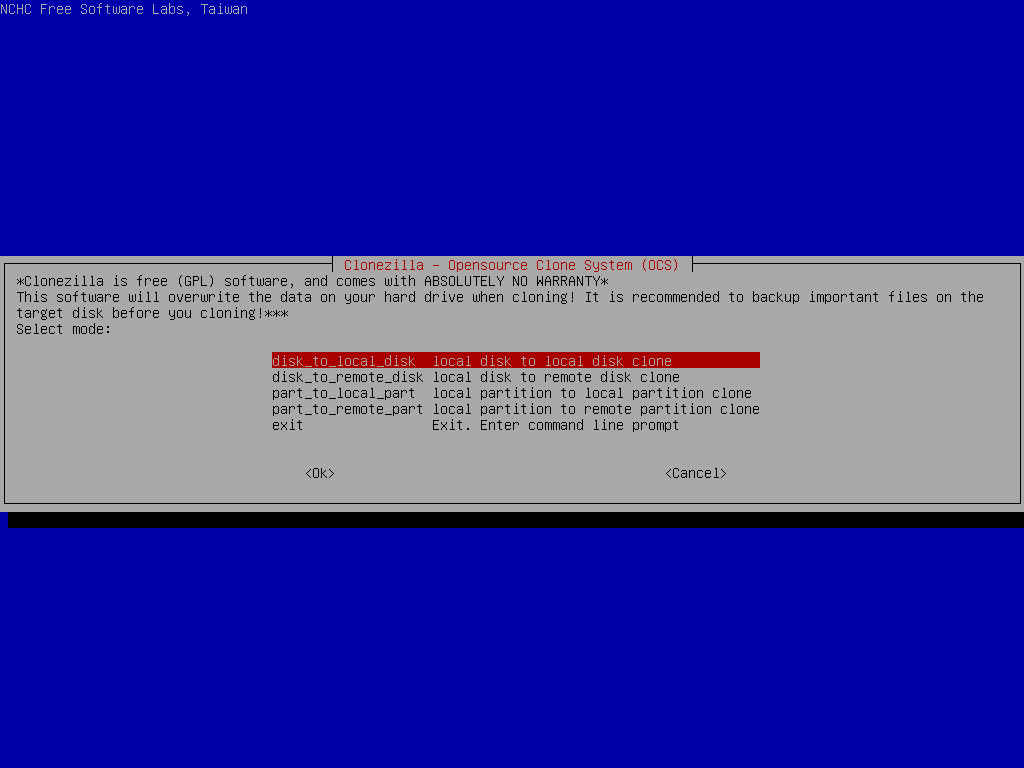
Download the compatible Clonezilla .iso file from http://dgit.in/cloneZilla and Tuxboot from http://dgit.in/tuxboot. When downloaded, use Tuxboot to create a bootable Clonezilla USB with the Clonezilla ISO. When done, restart your system, and enter System BIOS. In BIOS, switch your boot order to boot from the USB before the default hard drive. Remember to save changes and exit. When you reboot, Clonezilla will start. Follow the instructions and create an image of your primary partition. For the sake of safety, store this image in an external source which is in no way connected to a network – neither yours or anyone else’s. After the image is created, remember to take an image of the 100MB Windows recovery partition on your hard drive and save it on the same aforementioned source.
This stock image of your PC is what we like to call your ‘Clean Clone’ (CC). In case your PC gets infected or corrupt, or just gets plain slow due to excessive and/or careless use, the CC can be used to bring back your PC to the exact state it was in when you created the CC.
When you have an oops moment somewhere down the line (a crack which wasn’t a crack at all?) and your PC needs to be cleared, all you need is GParted, a free partition editor for graphically managing your disk partitions and your CC. Run GParted on your PC to format an infected partition to remove all traces of viruses and then restore the image you’ve saved in your CC through Clonezilla to return to your clean system.
In case you forget to back up the Windows recovery partition, you may have a bootmgr issue, which can be resolved with a Windows boot disc. Learn how to create one from our ThinkDigit article on installing Windows http://dgit.in/instWin
However similar Clonezilla may seem to using a system restore point, there are certain pros and cons of both these techniques. The restore point may change your install and registry files to an earlier, more stable state, but it doesn’t affect the files on your PC. The problem with this is that if you’re infected with malware or any other virus, there’s a high chance it will still be there after the restore. Clonezilla solves this issue, but also wipes off any data you may have downloaded onto the PC after you created the CC, so be wary of that.
Clean install (the hard but right way)
As an ultimate step, you could begin right from the start. This basically involves removing everything from your PC and reinstalling your OS and software from scratch. Yes, it’s quite the task, but sometimes issues like a boot sector virus and particularly intelligent malware can force one to take such inevitable steps.
The process is pretty standard, but if you need to know more about it, check out our article on disinfecting your PC at http://dgit.in/disinPC
Things to do before wiping your PC clean
Here’s a short generic checklist of things to keep in mind before you completely erase your PC.
Don’t keep your precious memories at risk of being wiped out. Though not enough for every photo a professional photographer takes, 1TB is enough to keep the important ones backed up in case of emergencies. And if you’re a smartphone pic taker, go Flickr!
• Autofill form data and saved passwords:
Not really priority #1, but it’s a luxury which, if you use often, is a pain to have to live without. And thus, it makes it into our pre-cleanup bucket list. If you use Chrome, then simply sync it all with your Google account. If you use Firefox, check out http://dgit.in/FoxFill at the Firefox forum for help.
• Ninite: A website for downloading bulk essential software for clean boot is http://ninite.com/ From anti-viruses and web browsers to music players and messaging apps, Ninite keeps it all ready to be downloaded in one bundle. Simply tick your necessary boxes, and click on ‘Get installer’. If you don’t want to dig into your precious bandwidth, simply pop in any of our Digit DVDs and look for the Essentials section. If you didn’t notice already, we’ve had your back for years, now.
• Sticky Notes:
They’re in your face all the time, but it’s very easy to forget to back up these important virtual postits on your desktop. Avoid the hassle of recalling what your sticky notes remembered for you, and simply remember to take them with you. Press [Win] [R], type in ‘%App- Data%MicrosoftSticky Notes’ and press [Enter]. This would lead you to a .snt file. Copy this SNT file to your backup folder.
• Google Drive/Sky Drive:
Your documents and other smaller files are important too. Back up your files on Google Drive, Sky Drive, or any of the other cloud storage tools out there. Cloud computing is the future. Hop on the bandwagon!
Be careful Don’t put yourself in a situation where you have to do a clean install in the first place! Take care of your PC and your PC will take care of you.

