
HIGHLIGHTS
Before you upgrade to iOS7, you should backup your device just to be safe.
Safety first, always, and even though upgrading iOS is usually a painless streamlined and hassle-free process, rarer things than something going wrong in tech have happened to all of us. It’s just sensible to backup when you mess with any OS on any device and Apple iOS devices are no exception.
How to backup and restore your iOS device
Even though, there haven’t been many cases where people have lost data when upgrading iOS versions, it’s always sensible to keep a backup of all your important data. There are two ways in which you can achieve this:
1. On the device itself
To backup to your your iOS device itself, you’d need an iCloud account, and have to enable the iCloud Backup option on your device. To do that, go to Settings > iCloud > Storage & Backup, toggle the iCloud Backup option “On”. Now, tap on “Back up Now” to start the backup process immediately. You’ll need to be connected to a Wi-Fi network, as this won’t happen over 3G. Also, once this option is turned on, every time the device is connected to a Wi-Fi network, is attached to a power source and is also screen locked, it will start backing up automatically to iCloud.
By Default, Apple gives you 5 GB of total storage, and you can buy more by clicking on the “Buy more Storage” option in Settings > iCloud > Storage & Backup.
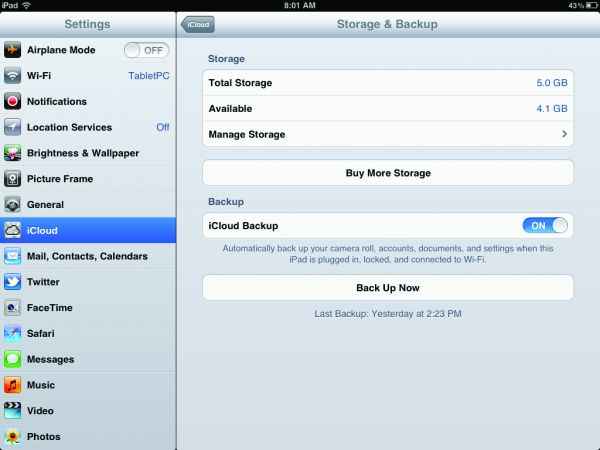
The Storage & Backup settings menu
Upgrades for 10 GB (for Rs. 1,100/year), 20 GB (for Rs 2,200/year) and 50GB (Rs 5,500/year) are available.
iCloud is the best option for you if you’re worried about data, want a periodic backup done automatically and want it to be hassle free. However, iCloud doesn’t backup anything that you didn’t purchase from the iTunes Store or the App Store, and thus won’t be able to restore stuff you added manually or didn’t purchase from the iTunes/ App/iBooks stores.
2. To a Computer:
Ah, the good old way. To do this, just plug your device to your computer or use the Wi-Fi sync option and open up iTunes. If you don’t have the latest version of iTunes, a notification to download the latest will appear first. Make sure you have the latest version installed in order to avoid any hiccups.
Click on the Devices button and select your device, then go to the “Backup” section at the bottom, select “This Computer” option under “Automatically Backup” and then click on “Back Up Now”. This will start the backup on your computer which can be used to restore data to your device later.
In order to backup over Wi-Fi, go to “Options”, select “Sync with iPad over this Wi-Fi” and then click “Apply”, to apply these settings. This will sync all the device data with your computer via iTunes when connected to that particular Wi-Fi connection.

iTunes Backup
By default, all the data that’s backed up is stored in the following locations:
Mac: Home/Library/Application Support/MobileSync/Backup/
Windows: \Users\(username)\AppData\Roaming\Apple Computer\MobileSync\Backup\
Use this option when you want to backup everything on your device and don’t want to be limited to the 5 GB of free space iCloud provides.
Recommended: Do both!
For an extra-level of redundancy, we recommend you do both! Although when iCloud backup is enabled, it disables Automatic syncing via iTunes, you can still backup to your PC manually. To do this, go to iTunes, select your device, go to the Backup Section and select “This computer” and click “Back Up Now”.
Restoring your Backup
Now that you’ve finished doing whatever it was that you wanted to do before restoring (such as upgrading to iOS7), it’s time to put your data back.
Restoring from iCloud: If you are going through the “Setup Assistant”, choose “Restore from iCloud Backup” and login with your iCloud ID and password. iCloud shows you the last three backups from the device, choose the correct one and voila, your data restoration begins! Get some snacks and wait it out.
If you are at the Home screen, go to Settings > General > Reset > Erase All Content and Settings. This will give you three options, choose the “Restore from iCloud Backup”, type in the credentials and follow the process described above.
Remember to keep your device connected to a power source. Also be warned that you might be asked for your iCloud and Apple ID credentials multiple times during the process, so it’s not a tap and forget procedure, and needs to be watched. Of course you can do other things on your device, so to get back to the progress bar, go to Settings > iCloud >Storage & Backup.
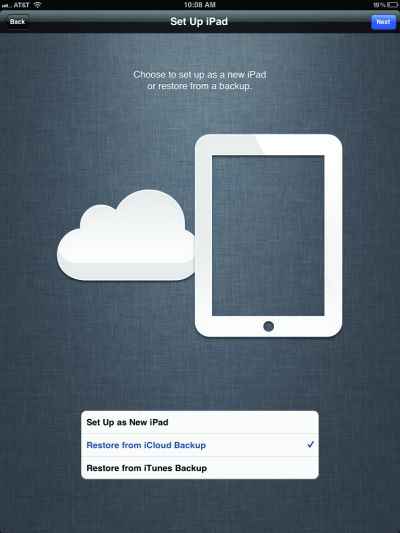
Restore from iCloud
Also, on the Home Screen, you will see progress bars underneath each app that’s being downloaded. In case you want to prioritise the sequence of app restoration, just tap on an app you want to use and it will be restored first.
Restoring from your Computer through iTunes: Just hook your device to the computer that holds the backup, open iTunes, select your device, scroll down to “Backups”, click Restore Backup, and choose the desired backup to start restoration. The progress bar on the top let’s you keep track of how much of your data is restored. Again, get some snacks and be patient.