How To Do Screen Recording On MacBook: Screenshot Tool, Quicktime Player, OBS, VLC

Screen Recording can be done on a Mac/MacBook using the Screenshot tool or Quicktime Player. This is the easiest way to record screen on MacBook.
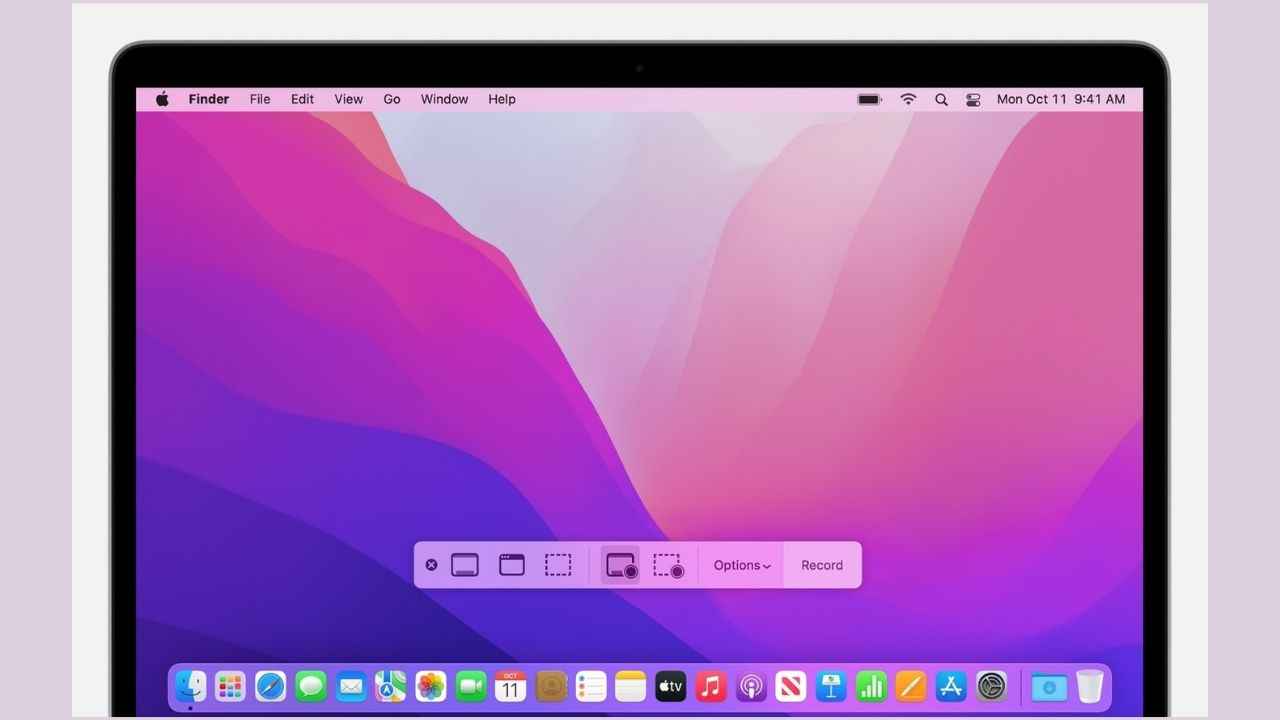
You can also download screen recorders for Mac from the Apple App Store.
We will cover all the best ways to record the Mac screen.
Apple macOS is one of the finest computer operating systems out there. It works smoothly, and efficiently and also packs a boatload of features — some in-built, while others can be acquired from software applications on the Apple App Store. This applies to the topic at hand too as you have an easy-to-do screen recording tool baked into the system and if you want something more advanced, you can go with any of the screen recorder apps we have listed down below. So, let’s begin understanding how to do screen recording on MacBook (or other Mac devices in general).

Table of Contents
How To Record Screens On MacBook Using Apple Screenshot Tool
1. Simultaneously press Command (⌘), Shift, and 5 (number). This is kind of a screen record Mac shortcut.
2. A Screenshot tool banner would appear at the bottom of the screen.
3. Choose between ‘Record Entire Screen’ or ‘Record A Portion Of The Screen’.
4. You can also change settings for where to save the recording, Hide/View mouse clicks, Timer duration, Microphone on/off, and source.
5. You will see a black camera icon on the screen when you go outside the banner’s perimeter. Click anywhere and you should see the recording icon appear on the top menu bar (towards the right-hand side). This means the recording is going on. If you click on that icon, the recording will stop and you will see a floating thumbnail on the bottom right corner of the screen. Click on it to play the recorded video.
How To Record Screens On MacBook Using Apple Quicktime Player
1. Open Quicktime Player from Application Folder or Spotlight Search.
2. The app has got no window but you will see a Q logoed icon on the dock. If Quicktime Player is currently selected, you will see its options on the top menu bar.
3. Click on File and then the ‘New Screen Recording’ option.
4. Again, you will see the screen recording banner at the bottom of the screen. The rest of the process is the same as above.
You can open recorded videos from the file library/ Finder by going to Quicktime Player Menu Bar > File > Open File. You can also record audio using Quicktime Player.
Best Free Screen Recording Apps For MacBook
- OBS: If you want a free, open-source, feature-rich, and powerful screen recording app, then OBS should be your pick. It is capable of recording using all sources and offers presets and precise control options. With it, you can record screen on mac with audio.
- VLC: If you already have the VideoLAN app on your Mac, you can go to the VLC menu bar > Open Capture Device > select the screen and audio settings. That’s about it. It’s a free, open-source, and cross-platform video player that can double as a screen recorder.
On a side note, you can use any of these aforementioned methods to record YouTube videos on Mac.
As for other news, reviews, feature stories, buying guides, and everything else tech-related, keep reading Digit.in.
G. S. Vasan
Vasan is a word weaver and tech junkie who is currently geeking out as a news writer at Digit. View Full Profile


