Quick guide to Android app development

Yes, we figured you’d need a quick and handy guide you can leave open on your screen while you attempt your first Android app! Developing for Android is quite easy, and that’s the best part about it. It utilises Java as the programming language and runs on a Dalvik Virtual Machine, which differs from a Java Virtual Machine. The Android Development Tools (ADT) plugin for Eclipse will give you all the necessary files for your new Android project and will even do half the work for you.
Installation
The Android SDK will run on Windows versions after Windows XP, Linux and Mac OS X (10.4.8 or later). In order to install the Android SDK, you will need JDK 5 or 6. To get the latest Android SDK, go here and select the appropriate version. This will download an archive file. Unzip it and save the contents in the location where you need the Android SDK.
Update the PATH environment variable to reflect the tools directory of the android SDK. To do this right-click on My Computer, and select Properties. Under the Advanced tab, click the Environment Variables button. Now double-click on Path (in System Variables). Now add the full path to the tools/ and platform-tools/ directories to the path.
If you prefer using it with Eclipse, you can install the ADT plugin by adding https://dl-ssl.google.com/android/eclipse to your install sources. After you install the ADT plugin, point it to the SDK home directory by going to Windows > Preferences > Android.
Ensure you install at least one Android platform in the environment. This should typically be the Android version of your intended application. To do this, open the Android SDK and AVD manager from the Eclipse workspace. Go to available packages, and install at least one platform and any additional packages you may need for development. These should then appear in the installed packages section. Finally, an Android Virtual Device can be created by going to the respective tab and clicking the new button, which subsequently asks for the machine name and its respective settings such as target platform and hardware features.
Components
Before starting with an actual example, let’s brush up on concepts in a generic Android application:
Activities
Every activity usually has a view or an interface associated with it; and hence, each activity can, also call other activities. An activity is a piece of code that makes the interface work. So, each activity can have a screen dedicated to it. But activities do not define an interface.
Services
Services in an Android application resemble daemons that run in the background continuously and perform some processing task that does not require a GUI.
Content providers
Content providers, as the name suggests, provide a mechanism for handling data whether it is between different activities or is to be persisted to a database.
Broadcast or intent receivers
Broadcast receivers or intent receivers are one of the most basic components of an Android system. These are used for responding to a public event or an intent that is received from the Android operating system.
Getting started
If you’re a developer, you’d know what’s coming up next. Hello World, it is. The focus here is on the approach. I won’t be doing much except creating a new project and trying to run it in our newly created AVD. It should print a string such as Hello World and the name of the main activity. If you’re new to Android, your first Hello World application doesn’t involve writing a single piece of code!
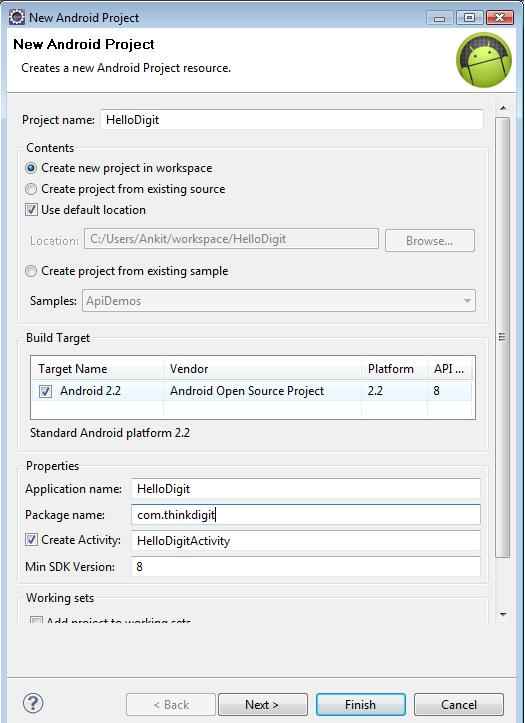
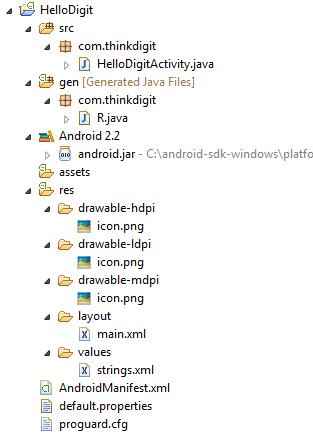
Here, I’ve created a new project by the name of ‘HelloDigit’ in the package ‘com.thinkdigit’ targeted for the Android API version 2.2, which creates a set of files as shown below.
Though each of these files have their own significance, the most important ones among here are:
- HelloDigitActivity.java
This is the file where all the code related to the main activity, i.e. the first screen is written.
- Android.jar
The library files related to the Android development environment.
- res/layout/main.xml
This XML file defines the GUI layout configuration for the main activity. It talks about how elements are to be shown, instead of the logic behind them.
- res/values/strings.xml
The strings.xml file stores all the values of the strings and other constants related to the application. So, you don’t have to change the code, the next time you change the layout.
- AndroidManifest.xml
This file is like the basic configuration file for your application and stores all the configuration related to the project in order to build and package it successfully into an Android application.
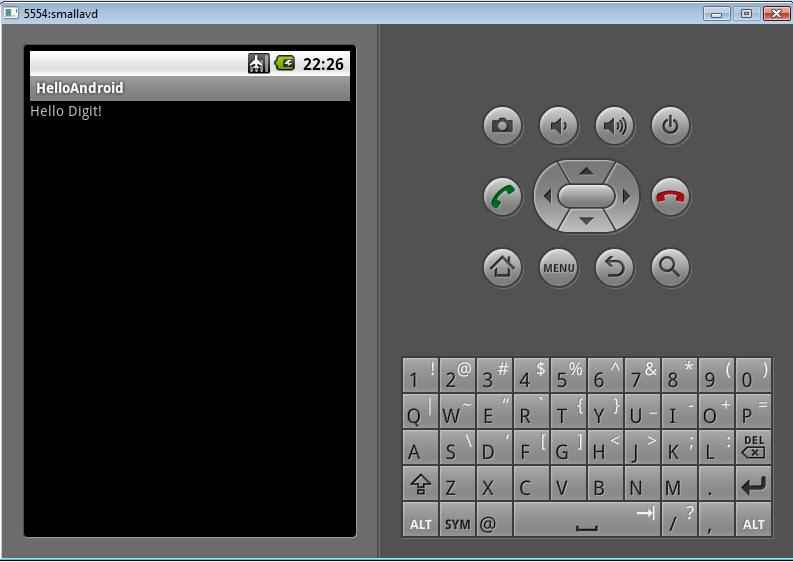
Each of these XML files has a customised editor dedicated to them in Eclipse. In fact, you can even create the interface by simply dragging and dropping the components and layouts with the new ADT plugin. You can now run the default project created here as an Android application. Click on Run as > Android Application. It will print “Hello World, HelloDigitActivity!” as soon as the application starts in the virtual machine. This text can be changed as you wish, by going to the strings.xml file and changing the value of the hello string. As you can see, you only need to change the XML for creating the interface. You don’t need to be a professional in Java.
All you need is a workflow such as this to build a basic application in Android! So go ahead and try out the most popular mobile platform out there today!

.jpg)


