
What are Flex and Catalyst?
Most of you will certainly be aware of Flash, and must have certainly viewed a Flash-based website at some point; however you might be less aware of Flex. The Flex SDK allows those familiar with ActionScript – the scripting language used in Flash – to write applications which run on the web or on the desktop using AIR.
The Flex SDK compiles code written in MXML, and ActionScript into Flash (swf) files which can run on any computer with Flash installed. MXML is a markup language – like HTML – which allows developers are declaratively design the user interface of an application. MXML ActionScript are analogous to HTML JavaScript, where the structure of your application is done in HTML, and the coding is done in JavaScript.
ActionScript is an easy language to learn, and those who are familiar with JavaScript will take no time picking up the basics. MXML too is quite simple to learn, for those familiar with XML and XHTML.
Catalyst is a new tool by Adobe, it is part of the Adobe CS5 collection and allows designers to create application user interfaces and designs, and then actually test them without needing to code at all. In this tutorial we will create a Twitter search widget which will let a user enter a query and display the search results.
We will start with a read-made design created in illustrator. Designing the visuals of the application is not covered in the tutorial, we leave that up to you. However if you want, you can download our design file from our website.
In case you decided to design the interface yourself, you should keep in mind that the design should have the following elements:
- An area to enter the search query
- A search button
- A design for what a tweet should look like. So it should include:
- A placeholder image for the Twitter avatar
- An area to display the tweet contents, enough to hold 140 characters
- A scrollbar design with at-least a thumb
This file should be either a Photoshop PSD file, an Illustrator ai file, or an FXG file. If you use a Photoshop or Illustrator you will be able to round-trip between the applications and edit assets as necessary. If you want you can skip creating the design in Photoshop or Illustrator, and directly create it in Catalyst; it has enough tools for this job. However in order to understand this tutorial properly, we recommend you use the file we provide.
Part 1: Flash Catalyst CS5
Launch Flash Catalyst CS5 and load the design you just created. You will see that Catalyst retains all the details.

Now one by one, you will have to tell Catalyst what is the function of each part of your application. In our example, we have a search box at the bottom, and search button next to it. So we select the area we want to designate as a search box and in the floating dialog with “Convert Artwork to Component”, we click on “Choose Component” and select “Text Input”. What we use this text input for and how we use it is something we will define later in our application in Flash Builder.

Now we select the search button and in dialog with “Convert Artwork to Component” we set this one to “Button”. If you want, you can now double click the button to further define how the button will behave on hover and selection. We went ahead and added a blue glow to the magnifying glass in the hover state.

Now we must do something about our scrollbar. We select all the components of the scrollbar and convert it to a “Vertical Scrollbar” component. Now the vertical scrollbar is a complicated component, with multiple sub-components. So we will need to click on “Edit Parts” and define each element of the scrollbar. The scrollbar needs at least two parts to work: the scroll track, which is the long vertical area along which the scrolling takes place, and the thumb, which is the part of the scrollbar which moves. If you want, you can also specify an up button and a down button, as we have done. You need now worry about the implementation details, all of which will be handled automatically.
Next we come to the main part, the list of tweets. Here we select the vertical scrollbar, the border around the tweets and the single design of the tween and convert them to a “Data List” component. Now, the data list component only needs one part defined in it, which is a sample item that will make up the list. We select our tweet and set it as a “Repeated Item”. We again have the opportunity to select what this list item will look like on hover and selection.

We are now done!
You can now switch from design mode to code mode to see your work. You can test the file if you want, by pressing Ctrl Enter or clicking on File->Run Project and the file will launch in the browser. Save this project file in a known location, next we will be opening it in Flash Builder.
STEP 2: Flash Builder
Flash Builder is a development environment for creating Flash files. While Flash CS5 is for creating Flash animations, and designs, Flash Builder is a development IDE for programming in in ActionScript and MXML using the Flex SDK.
Flash Builder is a paid product and does not come cheap, however if you are a student, or are unemployed, you can get the Flash Builder IDE for free. The Flex SDK which is the at core of Flash Builder and is responsible for compiling your projects, is itself free and open source, so you can build and run projects with it using the command line. There are free IDEs available as well, such as FlashDevelop, which is an open source IDE for developing Flash content using the Flex SDK. FlashDevelop is a worthy alternative to Flash Builder.
Coming back to the project; you will now have a “.fxp” file which is simply a zip files renamed to fxp. Flash Builder can import this file as a project, and you start your actual coding. In Flash Builder, click on File->Import Flex Project (FXP)… and in the dialog which pops up; provide the location of the fxp file. Now click on finish, and Flash Builder will extract the project code and load it.
What you’ll see at the left is the structure of your project which should look something like the one you see in our sample image.
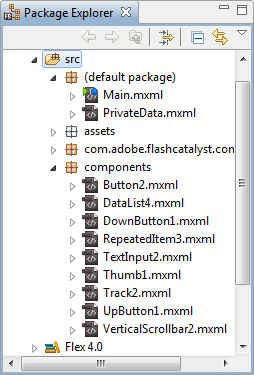
Now open the “Main.mxml” file in the “(default package)” under the “src” folder. This is the entry point in your application; it is the file which will actually be launched. It references the other assets you have created.
When you open it, and switch to code view you will see a lot of repeated data inside the List tag; delete it all. It is the design time data which Catalyst created to help you test your application. After removing it, your code should be simply:
<s:List skinClass="components.DataList4" x="3" y="11" d:userLabel="Data List"> </s:List>
Now it is time to connect our application to Twitter. For this we will use the bundled Data Wizards which come with Flash Builder. Click on the menu entry Data->Connect to XML…, or in the Data/Services panel click on “Connect to Data/Service…” link, and choose “XML”.
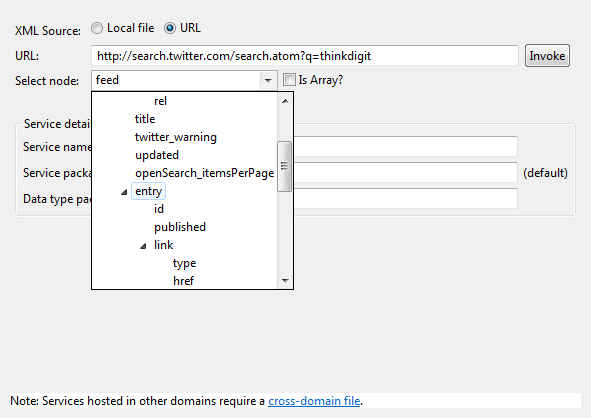
In the dialog which launches, we need to enter the Twitter search URL. First select “URL” as the “XML Source”.
![]()
Then enter the URL for searching on Twitter, which is:
http://search.twitter.com/search.atom?q=<search query>
In order to use this URL you will need to provide a some search text so that the Flash Builder data wizard can now what kind of data it is dealing with. So enter something like “http://search.twitter.com/search.atom?q=thinkdigit”.

Now click on the “Invoke” to button to have Flash Builder fetch this URL and inspect the data. You see a brief progress dialog, and then you will notice that the “Select Node” combo box now has a few options to choose from. Here select “entry” as that is a repeated node which contains the list of all tweets. The “Is Array?” checkbox next to it will automatically get selected. Leave the rest of the values be, and click on “Finish”. Our application is now connected to Twitter, and you will see details of our connection in the “Data/Services” panel.
This wizard has automatically generated code to enable our application to connect to the Twitter search API, and retrieve results from a query. The wizard is smart enough to recognize that the “?q=thinkdigit” part of the URL is a parameter, and will vary with each call. It will automatically take this in account while generating the code, so you can simply call the “getData” function of the service with the search string as a parameter and you will get the search results in a ready-made array!
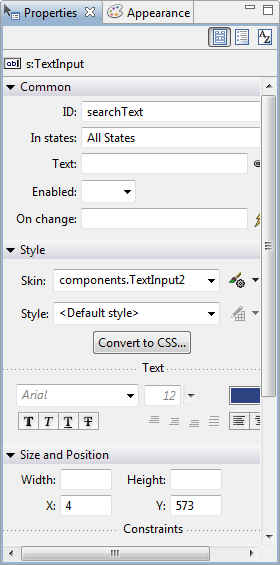
Before we move on, we have a text box for entering the search query, however right now it is not assigned any id. Without an id we cannot use the text entered there in our code to construct the query. Let us create an id first.
In the design mode, select the search query input box. In the “Properties” panel on the right enter an id, for example “searchText”.
We would like to have this search query run each time the user clicks the search button. To do this, in the design mode, select the search button, and in the “Properties” panel in click on the lightning icon next to the “On Click” entry.
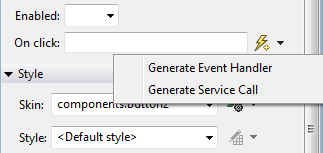
Click on “Generate Service Call” since we need to load the data in response to this button.
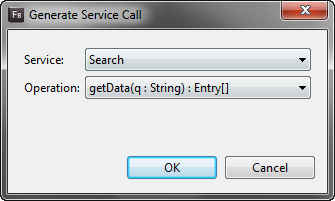
Now when you click on OK, you will see Flash Builder has already created code to call the “Search” service code and retrieve the results. You will see code like:
protected function button_clickHandler(event:MouseEvent):void { getDataResult.token = search.getData(/*Enter value(s) for */ q); }
Here, you need to replace the stuff inside “search.getData” with “searchText.text”; you will notice “searchText” is the id we gave to the search query box. So we get:
protected function button_clickHandler(event:MouseEvent):void {getDataResult.token = search.getData(searchText.text); }
What this code is doing, is requesting the search service – which is responsible for communicating with Twitter to get the data – to retrieve the search data for the query text entered in the text box “searchText”.
Since the query might take some time to complete, instead of returning the data itself, it returns a token. This is something like getting a token in the bank and being told to wait while other work (or your own work) is being done. When the service is finished getting data from Twitter, it will automatically get updated.
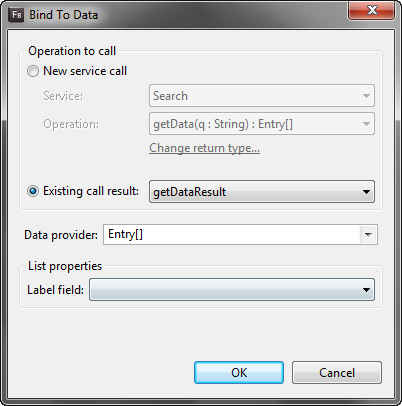
Now what we need to do is connect our list UI to the data we are getting. To do that we need to connect the list of tweets in our application to the service call for getting the search data from twitter. For that you need to first switch our application to Design mode. Now, from the “Data/Services” panel drag and drop the “getData(q:String):Entry[]” node to where you have the list of all tweets.
This will pop up a dialog called “Bind to Data” from where you can specify how the list is connected to the data being retrieved. Since we already have the data being returned by the search button, you need to select “Existing call result” in the “Operation to call” section. It should have only one entry, the one for the service we are calling when we click the search button. For the “Label field” entry combo-box you need to select the first empty entry, since we will be managing that on our own.
That’s it as far as the list is concerned. However one issue still remains. Our list does not know how to handle the data returned by Twitter. To change this we will need to edit our list code.
The code relevant to how data is displayed is in the definition for the “Repeated Item”. It should be a file called “RepeatedItem3.mxml” or something similar. This code is what is displaying each single tweet, and the list simply repeats this item with each piece of data.
The simplest way to do this is using the code mode; switch to code mode. Now there are two entries of interest: the text area showing the tweet content, and the image displaying the user’s avatar.
The text area code will look something like the following:
<s:RichText ai:aa="2" color="#000000" columnCount="1" fontFamily="Arial" fontSize="14" height="61" d:id="3" kerning="on" tabStops="S36 S72 S108 S144 S180 S216 S252" text="{data.text1}" d:userLabel="This was a tweet which I had created such that it ..." flm:variant="1" whiteSpaceCollapse="preserve" width="282" x="89" y="11"/>
You will see that the text content here shows “{data.text1}”. Change the text property to “{data.title}” which is what contains the tweet data.
Second we need to set the image source. The code for the image will look like:
<mx:Image d:id="4" maintainAspectRatio="false" smoothBitmapContent="true" x="17" y="13" source="{data.image1}"/>
Change the “Source” entry in the “Properties” panel from “{data.image1}” to “{data.link[1].href}”.
Now this last bit needs a little explanation. Why “{data.link[1].href}”, why “{data.title}”?
First of all, when the Flex list creates each new item in the list, it stores the data that the list item needs to display in the “data” property. Since this app is connected to an atom feed returning data about Twitter search results, each entry will have the fields that an atom feed has. It will have an author, a content entry, an id, a title, a published time stamp, two link entries and the rest is mostly twitter specific data relating to geolocation of tweets etc.
The content entry has an HTML representation of the tweet, the author has the author name, the title has the simple tweet content, and the two link entries have a link to the tweet and a link to the image of the author of the tweet. Each link has a “href” property with the actual URL to the resource. Here is a sample of the XML code for a single entry:
<entry> <id>tag:search.twitter.com,2005:14017285006</id> <published>2010-05-15T04:05:37Z</published> <link type="text/html" href="http://twitter.com/Yasuwo_h/statuses/14017285006" rel="alternate"/> <title>http://bit.ly/96185f Firefox3.7を待つしかないのか・・・</title> <content type="html"><a href="http://bit.ly/96185f">http://bit.ly/96185f</a> Firefox3.7を待つしかないのか・・・</content> <updated>2010-05-15T04:05:37Z</updated> <link type="image/png" href="http://a1.twimg.com/profile_https://static.digit.in/fckeditor/uploads/file/839991720/anime-firefox_normal.png" rel="image"/> <twitter:geo> </twitter:geo> <twitter:metadata> <twitter:result_type>recent</twitter:result_type> </twitter:metadata> <twitter:source><a href="http://sourceforge.jp/projects/tween/wiki/FrontPage" rel="nofollow">Tween</a></twitter:source> <twitter:lang>ja</twitter:lang> <author> <name>Yasuwo_h (Yasuwo)</name> <uri>http://twitter.com/Yasuwo_h</uri> </author></entry>
What we need are the title – hence “{data.title}” – and the image, which is the second link entry – hence “{data.link[1].href}” which is the “href” property of the second (ActionScript arrays start from 0) link entry.
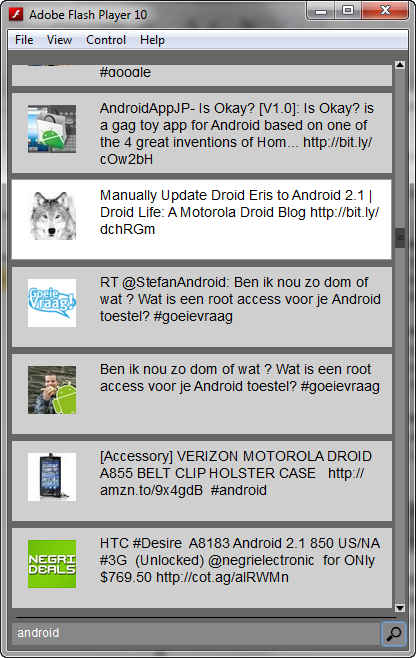
Congratulations! Your Twitter search widget is now complete.
If you test the application it will open in a browser window, and on entering a search term and clicking on the search button, it will display the search results.
If you want to run this as a desktop application, there is a way to do that as well. Right click on your project in Flash Builder, and under “Add/Change Project Type”, click on the first entry “Convert to Flex Desktop Project (runs in Adobe AIR)”. When asked, choose to convert the application tags. There are a few steps required before you can package this application and install it, but you can test the application through Flash Builder for now.
This widget is certainly not complete. For one it doesn’t even display the id of the user for each message! There is a lot more information available from Twitter in the feed which is not being utilized. This is a task we leave to you. Modify this application, add the required entries in Catalyst and code them in Flash Builder.
Ignoring some missing features which can be added with little effort, you can still get a simple application such as this implemented in less than half an hour, which is a remarkable feat indeed.
You can download a free trial of Adobe Flash Builder 4 and Adobe Flash Catalyst CS5 from the Adobe website.