WebRTCScreenSharing Application

Introduction
WebRTC is a free, open project that enables web browsers with Real-Time Communications (RTC) capabilities via simple JavaScript* APIs. The WebRTC components have been optimized to best serve this purpose. WebRTC has now implemented open standards for real-time, plugin-free video, audio, and data communication and is currently only supported on Google Chrome*, Mozilla Firefox*, and Opera* browsers. For now, screen capturing is not supported on Firefox and Opera.
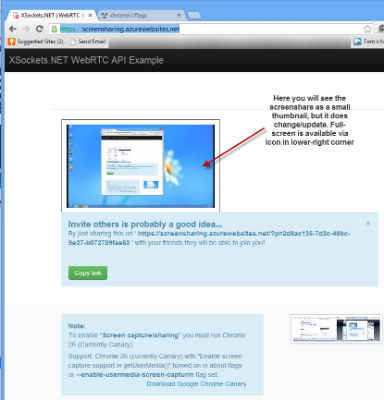
This paper describes the Screen Sharing Sample App that runs in the Chrome browser. This app demonstrates how to do screen sharing using a Chrome extension to access the desktopCapture API in your web application. The WebRTCScreenSharing application consists of HTML and JavaScript. HTML code handles input from the user and performs the necessary steps to format all visual aspects of the webpage. The JavaScript portion of the app contains the page’s variables and run-time logic. The JavaScript code creates the connection to the signaling server and calls the WebRTC functions.
Screen Sharing Sample App Structure
WebRTCScreenSharing application uses the Screen Sharing extension, which consists of background.js, content-script.js, and manifest.json. The main logic of the extension is contained in background.js. In Chrome browser, shared screen can only be viewed as a video stream. WebRTC transmits screen sharing as a media stream. The app can access the desktopCapture API through the permission that is in manifest.json:
"permissions": ["desktopCapture","<all_urls>"]
The background page is isolated from the application environment because it runs in the extension and cannot access the app directly. The extension interacts with web pages through content-script.js. A content script is JavaScript code that executes in the context of a page that's been loaded into the browser. The content-script does not have access to variables or functions defined on the page, but it has access to the DOM. The message is passed through the following chain:
When "Share Screen" is clicked, window.postMessage({ type: ' Start_Sharing’, text: 'start' }, '*'); posts a message to the screen.
1 window.addEventListener('message', function(event) {
2 if (event.data.type && ((event.data.type === 'Start_Sharing’))) {
3 port.postMessage(event.data);
4 }
5 }, false);
The content-script talks to the background page by setting the port variable to:
var port = chrome.runtime.connect(chrome.runtime.id);
The background page is listening on that port:
1 port.onMessage.addListener(function (msg) {
2 if(msg.type === 'Start_Sharing') {
3 requestScreenSharing(port, msg);
4 }
5 if(msg.type === 'Stop_Sharing') {
6 cancelScreenSharing(msg);
7 }
8 });
The background page gets access to the stream and sends a message containing the chromeMediaSourceId (streamID) back to the port (the content-script):
01 function requestScreenSharing(port, msg) {
02 desktopMediaRequestId =
03 chrome.desktopCapture.chooseDesktopMedia(data_sources, port.sender.tab,
04 function (streamId) { if (streamId) {
05 msg.type = 'Sharing_Started';
06 msg.streamId = streamId;
07 } else {
08 msg.type = 'Stop_Sharing';
09 }
10 port.postMessage(msg);
11 });
The content-script posts the message back to app.js:
port.onMessage.addListener(function(msg) { window.postMessage(msg, '*'); });
In app.js, navigator.webkitGetUserMedia is called with the streamID:
1 if (event.data.type && (event.data.type === ‘Sharing_Started’)) {
2 startScreenStreamFrom(event.data.streamId);
3 }
Extension InstallationSteps
The extension must be installed first. Since extension.crx and extension.pem files come with this package, skip step 2. "Warning: As of Chrome 33, Windows stable/beta channel users can only download extensions hosted in the Chrome Web store, except for installs via enterprise policy or developer mode (see Protecting Windows users from malicious extensions). You can still create your own .crx file and use it for testing in the dev channel, but you can't host that file on your own server." (sourcehttps://developer.chrome.com/extensions/hosting).
1. Go to chrome://settings and choose Extensions.
2. Click the "Pack Extension” button. Navigate to the "extension" directory in “Extension root directory" field. For "Private key file" select private key saved in "extension.pem". Click the "Pack Extension" button when done. The extension file will be saved one level up from "extension" directory, named "extension.crx". Note, if you are creating a new crx file, erase the old file with the same name
3. Drag and drop "extension.crx" file from “extension” directory. The extension will be installed
Conclusion
This sample app demonstrates how a simple screen sharing app works in Chrome. The app uses the chrome deskopCapture API, which allows end users only to view the screen. It also explains how to create and install Chrome extension for the app. It is not a desktop sharing app; desktop sharing is possible only through native (C/C++) applications. You can share screens from Chrome and view them over any WebRTC compatible browser. Firefox/Opera has no support of screen capturing yet. However, you can view shared screens on both Firefox and Opera.
For more such Android resources and tools from Intel, please visit the Intel® Developer Zone
Source: https://software.intel.com/en-us/articles/webrtcscreensharing-application


