Tutorial: Typing in the air using depth camera, Chrome, JavaScript, and WebGL transform feedback

Introduction
My previous article, Depth Camera Capture in HTML5, introduced a web application API to capture and manipulate depth stream data from cameras like the Intel® RealSense™ Depth Camera in the Chrome* browser (with no need for additional extensions). This pushes the boundaries of what JavaScript* apps can do and enables application developers to innovate new features and web apps. The tutorial here shows you how to use the API and the same camera to implement a specific case of gesture recognition and provides links to code you could run and reuse.
The first time I showed this typing in the air demo to my friend, Babu, he said something along the lines of, “That’s not convenient.” Although I might be able to input the text faster this way than scrolling through the character grid, I agree that this method is not convenient on its own. However, it is a good illustration for a tutorial that demonstrates the potential of gesture recognition with depth cameras.
Setup
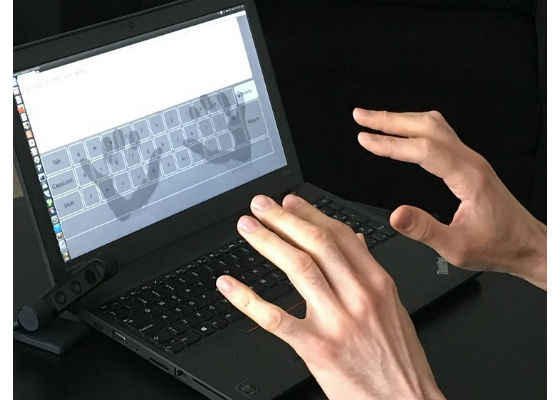
Plug the Intel® RealSense™ SR300 based camera into a USB 3.0 port of your Linux*, Windows*, or Chrome OS* machine. Since it is a near-range camera, the SR300 fits the use case here well. The camera should point towards you, as seen in the photo below. Once you get your hands closer to the camera, you’ll notice that they become visible over the keyboard. Then, the closest fingertip movement is analyzed as the code checks if there is a down-up movement that should be interpreted as a keystroke.
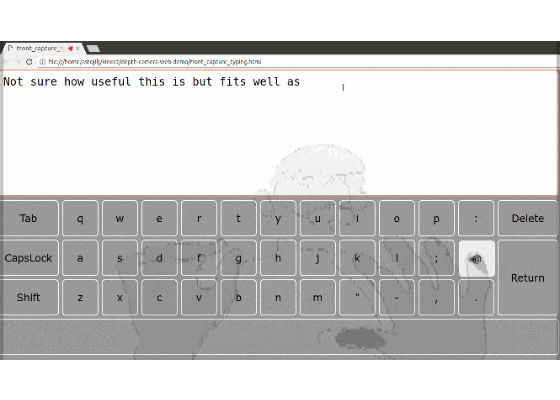
Get your fingers close to the camera and attempt to type, and eventually you’ll manage to type something without many mistakes. I made the Delete key a bit larger and easier to hit to help you fix any mistakes. Typing like this is a matter of practice. The captured screenshot animation below shows how it works.
This approach could be improved, but that would be out of scope for this tutorial.
The algorithm and the API used
This approach has two steps: First, we preprocess every pixel on the GPU to identify potential keystroke candidates, and then we process them on the CPU. Different use cases are expected to use algorithms that are highly tailored for each use case, but the general idea should be the same:
Step 1 on GPU
1. Process every pixel or tile.
2. Map depth to color.
3. Sample around both depth and color textures, and try to recognize features in the shader.
4. Prepare the output result, either as transform feedback output or render to texture followed by readPixels.
Step 2 on CPU
1. After selecting the interest area from the GPU step output, process and handle the results.
2. It is essential that the GPU (shader code) reduces either the number of candidates or the area to postprocess on the CPU, but that it is still robust enough to avoid missing the feature.
API
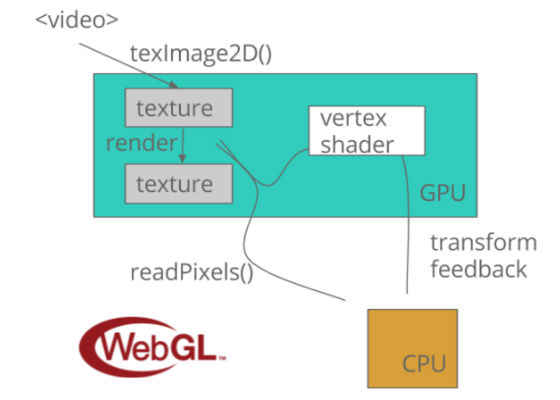
The WebGL* API used for this demonstration is presented on the picture below.
It starts with a <video> tag and WebGL texImage2D. I described that part of the API in a previous tutorial. In short, we follow these steps:
1. Create HTML <video> tag.
2. Call getUserMedia(constraint_to_depth_stream) to get the depth stream. If the algorithm requires it, get the color stream, too.
3. Set the stream as the video source. For example: video.srcObject = stream;
4. Upload the latest captured depth video frame to texture. For example: gl.texImage2D(gl.TEXTURE_2D, 0, gl.R32F, gl.RED, gl.FLOAT, video);
For some use cases, like in rendering 3D point cloud, it is not necessary to read back the data from GPU. When needed, use WebGL 2.0 transform feedback or readPixels.
Step 1: GPU part of algorithm
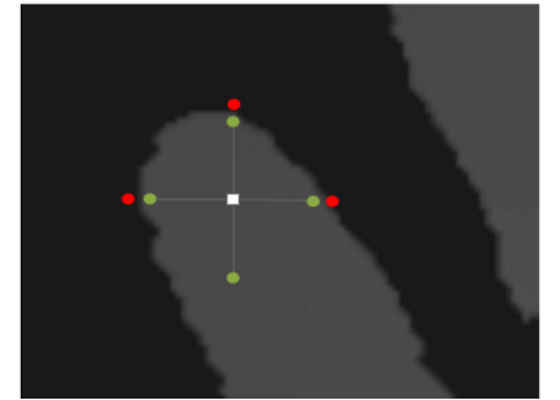
This tutorial describes the transform feedback path. In the example we follow here, vertex shader code detects the points that are the centers of the area, as described by the picture:
So, using only depth texture, we sample around and increase the distance of samples to the point. The idea is that on distance D (the green dots on the picture), all of the samples are inside the finger area, but on the distance D + 3, three or four out of total four samples (the red dots) are outside the area.
The part of vertex shader code doing this is shown below:
// Vertex shader code; transform feedback returns |depth|.
// We have previously checked that the point is at least 3
// pixels away from the edge, so start from i = 4.0.
float i = 4.0;
float number_of_dots_inside = 4.0;
for (; i < MAX_DISTANCE; i += 3.0) {
// Sample the texels like on the picture on the left.
d_0 = texture(s_depth, depth_tex_pos + vec2(i, 0.0) * step).r;
d_90 = texture(s_depth, depth_tex_pos + vec2(0.0, i) * step).r;
d_180 = texture(s_depth, depth_tex_pos – vec2(i, 0.0) * step).r;
d_270 = texture(s_depth, depth_tex_pos – vec2(0.0, i) * step).r;
if (d_0 * d_90 * d_180 * d_270 == 0.0) {
number_of_dots_inside = sign(d_0) + sign(d_90) +
sign(d_180) + sign(d_270);
break;
}
}
// > 7.0 serves to eliminate "thin" areas. We pass depth > 1.0 through
// transform feedback, so that CPU side of algorithm would understands
// that this point is "center of fingertip" point and process it further.
if (number_of_dots_inside <= 1.0 && i > MIN_DISTANCE) {
// Found it! Pack also the distance in the returned value.
depth = i + depth;
}
The value of texture(s_depth, sample_position).r is 0 if it is outside the captured area. Otherwise, the value is positive and as sign() returns 1, we use sum of sign() values to count the number of dots inside. Inline comments explain the returned value.
Step 2: CPU part of algorithm
We start this by getting the transform feedback buffer data. The code includes the calls issuing Step 1 and getting the buffer data using getBufferSubData, and looks like:
gl.bindTransformFeedback(gl.TRANSFORM_FEEDBACK, gl.transform_feedback)
gl.bindBufferBase(gl.TRANSFORM_FEEDBACK_BUFFER, 0, gl.tf_bo)
gl.beginTransformFeedback(gl.POINTS);
gl.drawArrays(gl.POINTS, 0, tf_output.length);
gl.endTransformFeedback();
gl.bindBufferBase(gl.TRANSFORM_FEEDBACK_BUFFER, 0, null)
gl.disable(gl.RASTERIZER_DISCARD);
gl.bindBuffer(gl.TRANSFORM_FEEDBACK_BUFFER, gl.tf_bo);
gl.getBufferSubData(gl.TRANSFORM_FEEDBACK_BUFFER, 0, tf_output, 0,
tf_output.length);
gl.bindBuffer(gl.TRANSFORM_FEEDBACK_BUFFER, null);
As tf_output size is video.videoWidth * video.videoHeight, we run the vertex shader and read the data through transform feedback for every pixel of depth video frame.
After that, on the CPU side, we do the following:
1. Attempt to compensate for the noise and identify the fingertip closest to the camera.
2. Pass the position of the fingertip to the shader that renders it.
3. Find the keyboard key under the fingertip and display it as hovered.
4. Detect press-down-and-up gesture of the single fingertip.
5. Issue a key click if detecting press-down-and-up gesture.
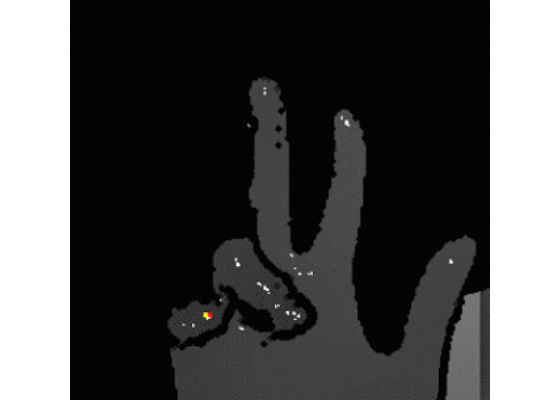
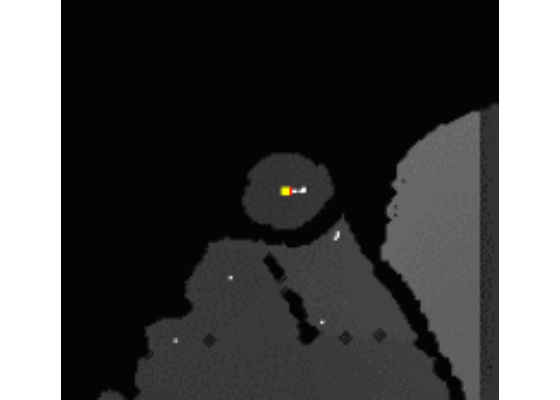
Let’s start with the data we get from the GPU in Step 1. White dots are identified as centers of the area and the fingertip candidates. The red dot is the one among them that is the closest to the camera. The animation below displays them.
In the CPU side step, we take only that red dot and try to further stabilize it by calculating the center of mass (this is the yellow dot on the pictures) of the shape around it. This step helps to reduce the noise that is intrinsic to the infrared based depth sensing camera technology. Roughly speaking, the yellow dot is then the calculated center of mass of all points connected to the red dot within the selected radius. When the finger is not moving, the yellow dot is more stable than the red dot, like on the animation below.
The algorithm implementing this is given in the extractMinumums() function. Starting from the red dot, we enumerate the surrounding points on the same distance, as if spreading waves of concentric circles. For each point of the circle, we access the elements that is towards the center (the red point) to check if the point is connected to the red point. This way, we enumerate all the connected points to the red and calculate the average coordinate (meaning, the center of mass).
Summary
This approach could be improved by tracking all of the fingers. That not only would enable simultaneous key presses, but the click detection would be more robust, as we would not only analyze the one point closest to the camera.
Instead of improving this, it makes more sense to use this demo as an illustration and instead spend time on different gesture recognition. For example, a low latency hand gesture click made of a quick contact between your thumb and index finger, like the one used in VR/AR demos. The next tutorial should be about that kind of gesture recognition implementation.
For more such intel IoT resources and tools from Intel, please visit the Intel® Developer Zone
Source:https://software.intel.com/en-us/blogs/2017/06/22/tutorial-typing-in-the-air-using-depth-camera-chrome-javascript-and-webgl-transform

