
Mystery Mansion* is a spooky, hidden-object adventure game from veteran game developer Cyrus Lum. The game took first place in the Pioneer track of the 2014 Intel® RealSense™ App Challenge, with its innovative, experimental approach drawing the attention of the judges.
As a self-described storyteller, Lum aims to “enhance that suspension of disbelief—to get [the] audience lost in the story and the world I’ve created.” Mystery Mansion is remarkable for its exclusive use of face tracking for the user interface (UI), which results in a highly immersive experience. However, the face-only approach posed a number of development challenges during Lum’s quest to implement intuitive controls and to create a satisfying user experience with a bare-bones UI. In this paper we’ll discuss the challenges encountered and the code Lum used to address them, including how to accurately calibrate the game’s UI for different players, and manage the movement and manipulation of objects in the environment with the intentionally limited control scheme.

The Mystery Mansion* splash screen, presenting its central, haunted-house theme.
Optimizations and Challenges
Face Tracking
The inspiration for Mystery Mansion came from Lum’s search for a way to use the capabilities of the Intel® RealSense™ SDK other than for hand gesture-control. This led to his decision to work on a game that would be controlled exclusively with face tracking.
After searching for a game theme and mechanics that would correspond with the necessarily simplified UI, Lum decided on a first-person, hidden-object game in the style of a point-and-click adventure. Controlling the game with the head alone, as if it were somehow detached from the body, inspired Lum’s idea of a ‘disembodied’ ghost as the game’s central playable character. In Mystery Mansion, the player takes the role of a spirit trapped in the mansion, looking to solve the mystery of its own death.
Nose and Eyes
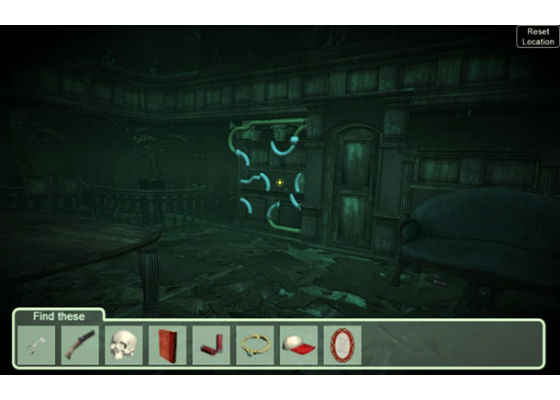
The game requires that players visually explore the environment, locating and collecting a series of items. For lateral and vertical movement, the Intel® RealSense™ Camera F200 tracks the movement of the face—specifically the nose—allowing the player to intuitively look around the environment. The directional movement of the player’s face is reproduced by the reticule on-screen.
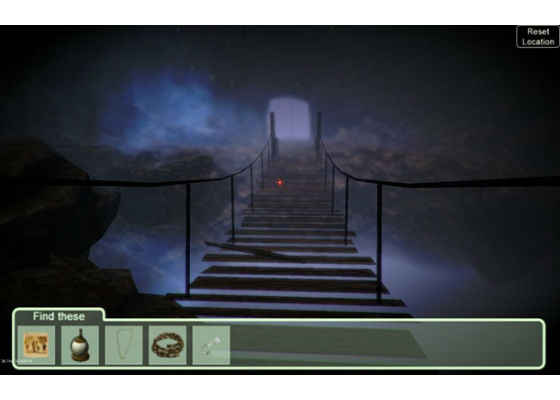
The red reticule is controlled by the movement of the player’s face, which is tracked by the Intel® RealSense™ camera.
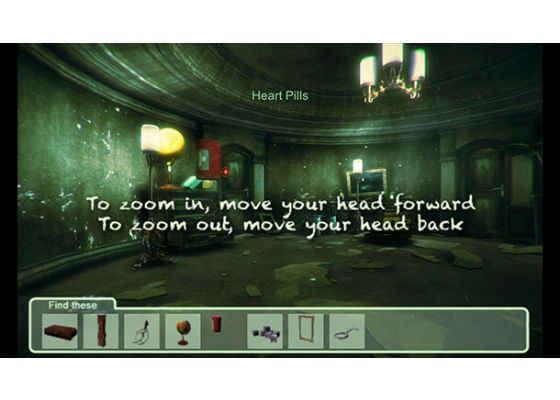
Lum wanted players to be able to explore the environment in 360 degrees—to turn left and right, and even look behind them. To make this possible, he implemented a system whereby once the player crosses a certain lateral movement threshold, the field of view begins to shift in that direction around the space, with the movement accelerating as the player’s view moves toward the edge of the screen.
To zoom in and out of the environment, the Intel RealSense camera tracks the distance between the player’s eyes. The closer together the eyes are in relation to the camera, the further away the user is–hence the more zoomed out from the environment (with the opposite true for zooming in). The camera zoom is calibrated to ensure that the player doesn’t need to move too close to the screen to effectively zoom in on objects.
/* get face data and calculate camera FOV based on eye distance. Use face data to rotate camera. */
void OnFaceData(PXCMFaceData.LandmarksData data) {
if (!visualizeFace) return;
if (colorSize.width == 0 || colorSize.height == 0) return;
PXCMFaceData.LandmarkPoint[] points;
if (!data.QueryPoints(out points)) return;
/* Use nose tip as the control point */
PXCMPointF32 xy=points[data.QueryPointIndex(PXCMFaceData.LandmarkType.LANDMARK_NOSE_TIP)].image
/* Get Left and Right Eye to calculate distance */
PXCMPointF32
xyEyeLeft=points[data.QueryPointIndex(PXCMFaceData.LandmarkType.LANDMARK_EYE_LEFT_CENTER)].image;
PXCMPointF32
xyEyeRight=points[data.QueryPointIndex(PXCMFaceData.LandmarkType.LANDMARK_EYE_RIGHT_CENTER)].image;
float tmpEye = Mathf.Abs ((xyEyeLeft.x – xyEyeRight.x) * eyeDistScale);
if (tmpEye < eyeDistNear) tmpEye = eyeDistNear;
if (tmpEye > eyeDistFar) tmpEye = eyeDistFar;
/* Use eyes apart distance to change FOV */
Camera.current.fieldOfView = eyeFOVcenter – tmpEye;
Code Sample 1: This code uses the distance between the user’s eyes to calculate his or her distance from the screen and then adjusts the field of view accordingly.
Optimizing the UI
Calibration
Lum observed that every player will have a slightly different way of playing the game, as well as different physical attributes in terms of the size, dimensions and configuration of the facial features. This meant that calibrating the face tracking at the start of each play session was key to making the directional controls function correctly for each individual player. Lum inserted a calibration stage at the start of each play session to establish the “zero position” of the player and to ensure that they can be tracked within the range of the camera.
To establish the “zero position” during the calibration stage, the player moves his or her head to position the reticule within a bordered area at the center of the screen. This ensures that the player is within the range of the camera (the tracking volume) when turning his or her head, or moving in and out. The process ensures a consistent experience for every player regardless of differences in face shape, size, and position in relation to the camera.
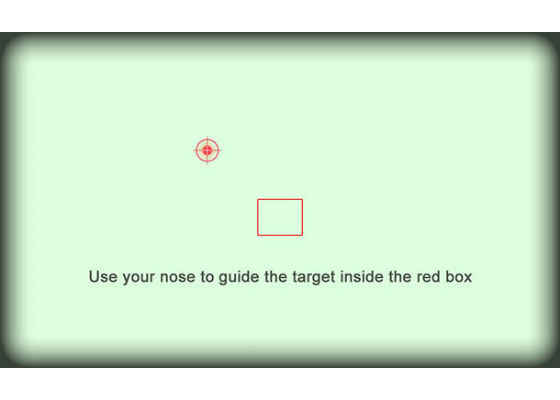
The calibration stage at the beginning of each play session helps ensure a consistent and accurate experience for each different player.
//check to see if target graphic is within the box
if (!calibrated && calibratedNose && gameStart && (295 * screenScaleWidth) < targetX && targetX < (345 * screenScaleWidth) && (235 * screenScaleHeight) < targetY && targetY < (285 * screenScaleHeight)) {
calibrated = true;
tutorialImg = tutorial1Img;
LeanTween.alpha(tutorialRect, 1f, 2f) .setEase(LeanTweenType.easeInCirc).setDelay(1.5f);
LeanTween.alpha(tutorialRect, 0f, 2f) .setEase(LeanTweenType.easeInCirc).setDelay(8f).setOnComplete (showTutorialTurn);
}
Code Sample 2: This code calibrates the game by ensuring the target reticule is within the red box show on the calibration screenshot.
Lateral Movement
The full freedom of lateral camera movement is necessary to create the 360-degree field of view that Lum wanted to offer the player. Fundamental to ensuring an optimized user experience with the in-game camera was the implementation of a safety zone and rotational acceleration.
//— rotate camera based on face data ———
/* Mirror the facedata input, normalize */
xy.x=(1-(xy.x/colorSize.width));
xy.y=(xy.y/colorSize.height);
/* exponentially accelerate the rate of rotation when looking farther away from the center of the screen, use rotateAccelerationScale to adjust */
newX = (0.5f-xy.x)*(rotateAccelerationScale*Mathf.Abs((0.5f-xy.x)*(0.5f-xy.x)));
newY = (0.5f-xy.y)*(rotateAccelerationScale*Mathf.Abs((0.5f-xy.y)*(0.5f-xy.y)));
/* Camera is a hierarchy mainCamBase with Main Camera as a child of mainCamBase. We will horizontally rotate the parent mainCamBase */
mainCamBase.transform.Rotate(0, (newX * (lookTimeScale*Time.deltaTime)), 0);
/* angleY is a rotation accumulator */
angleY += newY;
if (angleY > lookUpMin && angleY < lookUpMax) {
mainCam.transform.Rotate ((newY * (lookTimeScale * Time.deltaTime)), 0, 0);
if(angleY < lookUpMin) angleY = lookUpMin;
if(angleY > lookUpMax) angleY = lookUpMax;
}
else angleY -= newY;
Code Sample 3: This code controls the rotation and lateral acceleration of the camera as the user turns his or her head further from the center of the screen.
If the player keeps the reticule within a specific zone at the center of the screen—approximately 50 percent of the horizontal volume—the camera does not begin to rotate, which ensures that the player can explore that area without the camera moving unintentionally. Once the reticule is moved outside that zone, the lateral movement begins in the direction the player is looking, and accelerates as he or she moves the reticule toward the edge of the screen. This gives the player accurate and intuitive 360-degree control.
Vertical Movement
Lum’s experiments showed that complete freedom of camera-movement was less practical on the vertical axis, because if both axes are in play, the player can become disoriented. Furthermore, little is to be gained by allowing players to look at the ceiling and floor with the interactive elements of the game occupying the lateral band of vision. However, players needed some vertical movement in order to inspect elements near the floor or on raised surfaces. To facilitate this, Lum allowed 30 degrees of movement in both up and down directions, a compromise that lets the player look around without becoming disoriented.
Gameplay Optimizations
After exploring a variety of gameplay mechanics, Lum decided to add simple puzzle solving, in addition to the core, object-collection gameplay. Puzzle solving fit with the overall game design and could be effectively and intuitively implemented using only the face-tracking UI.
The player picks up items in the game by moving the reticule over them, like a mouse cursor hovering over an object. At the rollover point, the object moves out of the environment toward the player—as if being levitated supernaturally—and enters the on-screen item inventory.
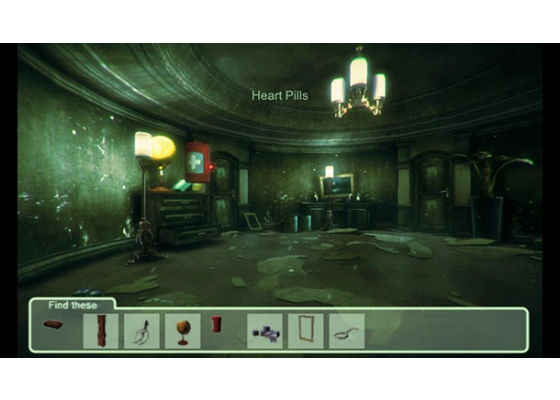
Here, the player has selected an object in the environment by moving his or her face to position the reticule over it, causing the object—in this case a pillbox—to move toward the player and into the inventory.
Ray ray = Camera.current.ScreenPointToRay(new Vector3((float)targetX, (float)Screen.height-(float)targetY, (float)0.1f));
RaycastHit hit;
if (Physics.Raycast(ray, out hit,100 )) {
if(hit.collider.name.Contains("MysItem")){
hit.collider.transform.Rotate(new Vector3(0,-3,0));
}
}
Code Sample 4: This is the code that lets the player pick up objects using the face-tracking UI.
Lum also needed the player to move from room to room in a way that would fit with the simplified UI and the logic of the gameplay. To this end, each room has an exit door that is only activated once the player has collected all the available objects. At this point, the player moves his or her face to position the reticule over the door, causing the door to open and moving the game scene to the next space.
To add variety to the gameplay, Lum explored and added different puzzle mechanics that could be manipulated in similarly simple and logical ways. One of these is the block puzzle, where the player uses the directional control to move blocks within a frame. Lum implemented this action in multiple ways, including moving blocks within a picture frame to reconstruct an image and moving pipes on a door in order to unlock it.
else if(hit.collider.name.Contains("puzzleGame")){
room currentRoom = (room)rooms[roomID];
puzzleItem tmpPuzzleItem = (puzzleItem)currentRoom.puzzleItems[hit.collider.name];
if(!LeanTween.isTweening(hit.collider.gameObject) && !tmpPuzzleItem.solved){
if(hit.collider.name.Contains("_Rot")){
LeanTween.rotateAroundLocal ( hit.collider.gameObject, Vector3.up, 90f, 2f ).setEase (LeanTweenType.easeInOutCubic).setOnCompleteParam (hit.collider.gameObject).setOnComplete (puzzleAnimFinished);
}
}
}
Code Sample 5: This code allows players to move blocks using face-tracking in order to complete some of the game’s puzzles.
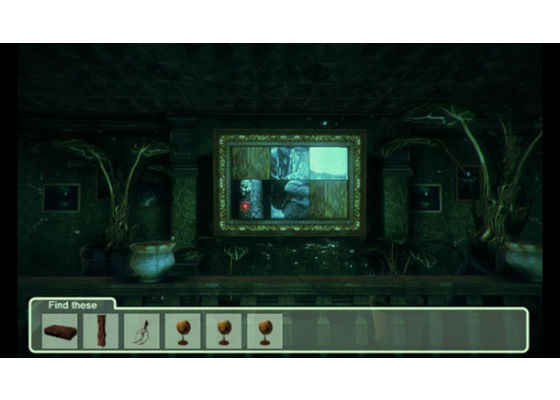
The puzzles include this block picture. The player uses directional control to move pieces and to reconstruct the image resulting in finding a clue.
In this puzzle, the player uses the face-tracked directional control to move the segments of piping.
Text prompts also appear on the screen to help the player determine the next step, for example, when he or she needs to exit the room.
Testing and Analysis
Mystery Mansion was developed in its entirety by Lum, who also conducted the majority of the testing. During development, however, he called on the services of three friends to test the game.
In the world of video games, no two players play a game exactly the same way—what seems intuitive to one player will not necessarily be so for another. This difference quickly became evident to Lum during the external testing, particularly with the face tracking. Testers had difficulty advancing through the game because they would position themselves differently, or simply because of differences in facial size and composition. Lum’s observations led to the implementation of the calibration stage prior to play and the addition of a tutorial at the beginning of the game to ensure that the basics of the UI are well understood.
The Tutorial stage helps players understand how to interact with the game using only the face-tracking interface.
Key Lessons
For Lum, when working with Intel RealSense technology and human interface technology, simplicity is absolutely key; a point that was driven home through his work on Mystery Mansion, where the UI is limited exclusively to face tracking. He’s a firm believer in the importance of not trying to do too much in terms of adding mechanics and features—even if it initially seems cool. Moving through the environment and manipulating objects using only face-tracking required careful iteration of the stripped-down UI, and a degree of tutorial “hand-holding” to ensure that the player was never in a position of not knowing what to do or how to advance through the game.
Testing played a key role in the development of Mystery Mansion. Lum found that developers should not assume that what works for one player will automatically be true for another. Every player will behave differently with the game, and in terms of the human interface of the Intel RealSense camera, each player’s face and hands will have different size, shape, movement and positional attributes which must be compensated for in the code.
The resources provided with the Intel RealSense SDK's Unity Toolkit ensured a straightforward development environment for Lum. Unity* is a user-friendly development environment that has well-tested and thorough compatibility with the Intel RealSense SDK, a wealth of resources (including those provided with the Intel RealSense SDK), a strong support community, and a ready stock of graphical assets from the Asset Store.
Lum believes that developers should always consider the physical impact of prolonged play times with hand gesture controls, which can sometimes lead to limb fatigue if the UI is not thoughtfully balanced for the player.
Tools and Resources
Lum found the process of developing his game using the Intel RealSense SDK straightforward. He also dedicated time to reviewing the available demos to pick up practical tips, including the Nine Cubes sample provided with the Intel RealSense SDK.
Unity
Lum chose to develop the game using Unity, which is readily compatible with the Intel RealSense SDK and offers a complete development environment. While Lum is an accomplished programmer in C#, the Unity platform made much of the basic programming required unnecessary, allowing him to iterate quickly in terms of developing and testing prototypes.
MonoDevelop*
To develop the C# game scripts, Lum used MonoDevelop, the integrated development environment supplied with Unity. Within MonoDevelop, Lum placed objects, set up properties, added behaviors and logic, and wrote scripts for the integration of the Intel RealSense camera data.
Nine Cubes
One of the fundamental building blocks for building Mystery Mansion was the Nine Cubes sample, which is a Unity software sample provided with the Intel RealSense SDK (it can be found in the frameworks folder of the samples directory in the SDK). This demo allows the user to move a cube using face tracking—specifically nose tracking. This functionality became the foundation of Mystery Mansion’s UI.
Unity Technologies Asset Store
Having already had experience with the Unity Technologies Asset Store for a previous project, it was Lum’s go-to place for the graphic elements of Mystery Mansion, essentially saving time and making it possible to singlehandedly develop a visually rich game.
Serendipitously, he was looking for assets during the Halloween period, so creepy visuals were easy to find.
What’s Next for Mystery Mansion
Since submitting Mystery Mansion for the Intel RealSense App Challenge, Lum has continued to experiment with features that help create an even more immersive experience. For example, recent iterations allow the player to look inside boxes or containers by slowly leaning in to peer inside. This action eventually triggers something to pop out, creating a real moment of visceral fright. Lum’s takeaway is that the more pantomiming of real physical actions in the game, the greater the immersion in the experience and the more opportunities to emotionally involve and engage the player.
To date, Mystery Mansion has been designed principally for laptops and desktop PCs equipped with Intel RealSense user-facing cameras. Lum has already conducted tests with the Google Tango* tablet and is eager to work on tablet and mobile platforms with Intel RealSense technology, particularly in the light of the ongoing collaboration between Intel and Google to bring Project Tango to mobile phone devices with Intel RealSense technology.
Intel RealSense SDK: Looking Forward
In Lum’s experience, context is crucial for the successful implementation of Intel RealSense technology. Lum is particularly excited about the possibilities this technology presents in terms of 3D scanning of objects and linking that to the increasingly accessible world of 3D printing.
As for Lum’s own work with human interface technology, he is currently pursuing the ideas he began exploring with another of his recent Intel RealSense SDK projects, My Pet Shadow, which won first place in the 2013 Intel Perceptual Computing Challenge. My Pet Shadow is a “projected reality” prototype that uses an LCD projector to cast a shadow that the user can interact with in different ways. It’s this interactive fusion of reality and the digital realm that interests Lum, and it’s a direction he intends to pursue as he continues to push the possibilities of Intel RealSense technology.
Lum’s Intel® RealSense™ project, My Pet Shadow, took first place in the 2013 Intel® Perceptual Computing Challenge.
For more such intel resources and tools from Intel on Game, please visit the Intel® Game Developer Zone.
Source: https://software.intel.com/en-us/articles/playing-at-ghosts-face-tracking-in-mystery-mansion


