Optimizations Enhance Just Cause 3 on Systems with Intel Iris Graphics
High-end PCs continue to drive desktop gaming with amazing graphics. Powered by CPUs such as the 6thGeneration Intel® Core™ brand i7-6700K, a state-of-the-art “dream machine” usually gets paired with a high-end discrete video card to run the most demanding games. One such title is Just Cause 3, developed by Avalanche Studios* and published by Square Enix*. Released in late 2015 to much acclaim, JC3 offers fiery explosions, lush terrain, and amazing scenery, as secret agent Rico Rodriguez fights, soars, glides, and grapples through an expanded open world of breathtaking beauty.
While console play was a big target audience, Avalanche wanted to ensure the game worked on the widest possible range of PC hardware, including systems with integrated graphics. Intel worked with Avalanche to complete a range of general optimizations that benefited all PC configurations, but didn’t stop there. They also formed a small independent team (mostly from the Engine and Research group at Avalanche Studios) in a separate joint-effort to optimize for the Intel® Iris™ and Intel® Iris™ Pro graphics chips. That work included harnessing the new graphics features of the 6th Generation Intel® Core™ brand CPUs.
The teams also worked with new graphics features for Microsoft* DirectX* 12-class hardware, exposed under the DirectX 11.3 API. Using additional resources from Intel engineers in R & D across numerous specialties, the result was a game that looked fabulous on the latest consoles and high-end gaming PCs, and also engaged players on well-equipped laptops with Intel Iris graphics.
Intel integrated graphics essentially come in three levels–the mainstream level is HD graphics, and the next step up is Iris graphics, which is high-end mainstream quality. The highest level of integrated graphics is Iris Pro graphics, and the latest version is found on 6th Generation Intel Core processors. In this case study, you’ll learn how Intel optimization tools yielded multiple avenues for improvements. We’ll drill down into the world of shaders, instancing, and low-level Arithmetic and Logic Unit (ALU) optimizations, and explain how Intel and Avalanche Studios searched for every last performance gain.
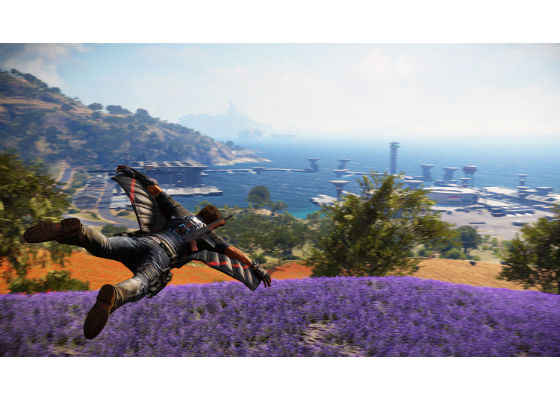
Figure 1. In Just Cause 3, hero Rico Rodriguez flies over terrain covered with intricate foliage.
Intel® Graphics Performance Analyzers (GPA) proved an excellent tool for helping optimize the complex world of Just Cause 3. This is the third installment of the tremendously popular franchise, which has sold anestimated 7 million copies across all platforms as of mid-2016. Offering 400 square kilometers of stunning terrain, from sunny beaches to snowy peaks, reviewers have called it a wide-open playground “primed for explosive action.” Intel and Avalanche focused their efforts on multiple optimizations, pushing the advanced rendering technologies to the limit.
Intel® Graphics Performance Analyzers Help the Cause
The Intel GPA tool suite enables game developers to utilize the full performance potential of their gaming platform. The tools visualize performance data from your application, enabling you to understand system-level and individual frame-performance issues, as well as allowing you to perform ‘what-if’ experiments to estimate potential performance gains from optimizations.
Intel graphics application engineer Antoine Cohade led the JC3 optimization effort from the Intel side. He traveled frequently from his office in Munich to Stockholm, Sweden, to meet with Avalanche developers–including Christian Nilsendahl, project lead, and Emil Persson, head of research. “We did a lot of work remotely, but we did some heavy profiling on site. At times, we were on the phone or live-chatting on a daily basis,” Cohade said. “Basically, we proved that it's possible to take the highest, most demanding game and have it playable on Intel hardware. Developers can use these tools and techniques to make their games playable on a wide range of mobile systems.”
In addition to other tools, the teams used three key parts of Intel GPA:
1. System Analyzer – Analyze CPU Graphics API, and GPU performance and power metrics.
2. Graphics Frame Analyzer – Perform single-frame analysis and optimization for Microsoft DirectX, OpenGL*, and OpenGL ES* game workloads.
3. Platform Analyzer – View where your application is spending time across the CPU and GPU.
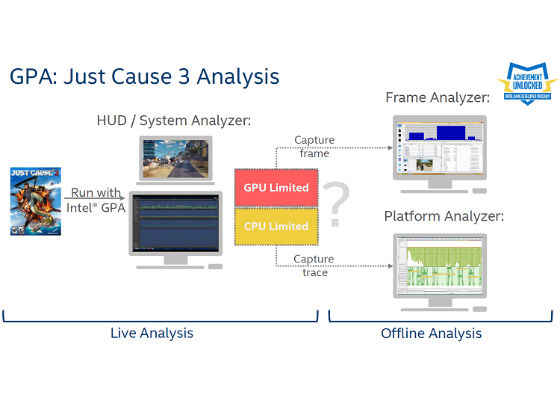
Figure 2. The optimization team started by running the System Analyzer, to determine if the system was CPU-limited or GPU-limited.
- Over six months–and among many other optimizations–the team fine-tuned these areas:
- Low-level ALU optimizations
- Instancing
- Vegetation
- Shadowing
- Dynamic Resolution Rendering
- DirectX optimizations, for DX11.3 API
Initially, Intel GPA revealed some key challenges. There were a high number of draw calls in multiple frames, and some individual draw calls were very expensive in terms of processing power. The clustered lighting shader and vegetation were key areas to improve.
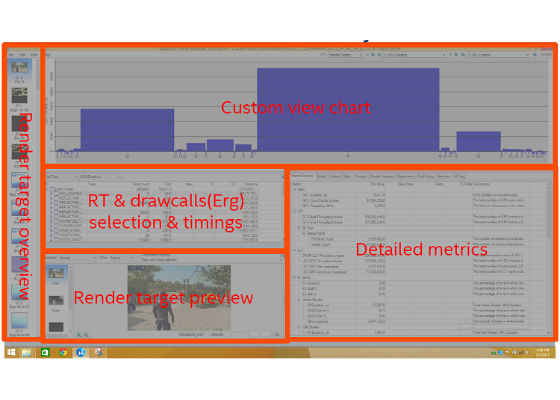
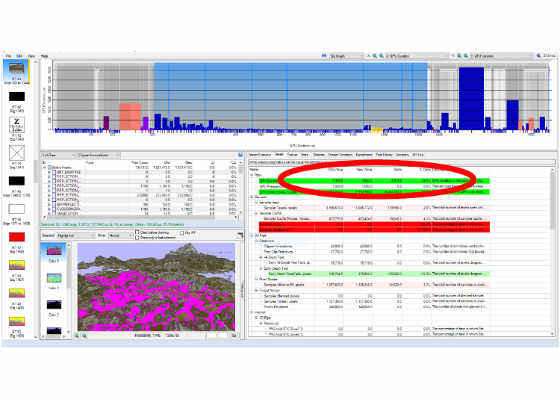
Figure 3. High-level view of the Graphics Frame Analyzer screen, showing where information can be found for various components.
The team determined that they should implement multiple ALU optimizations to streamline expensive individual shaders. They also investigated areas where high draw counts were frequently making the game CPU-limited, due to the cost of the individual API calls.
Start at the Bottom: Tweaking the Arithmetic and Logic Unit (ALU)
Much of the low-level ALU optimization effort involved re-working the math to generate fewer instructions. Emil Persson, who has published his work and presented two key papers on shading and optimization at the Game Developers Conference, was the leader of this effort. Some of Persson’s lessons are fairly simple: don’t rely on the compiler optimizing for you, separate scalar and vector work, and remember that low-level and high-level optimizations are not mutually exclusive–try to do both.
The investigation showed that the shader compiler wasn’t producing optimal code, which is not intuitive. Persson was able to make very small changes to force the compiler to create incrementally better output. “I think it’s pretty rare that someone goes that low-level and takes the time to document it,” Cohade said of Persson’s work. “You rarely see that kind of effort. You see the optimization, but you don’t see it documented.”
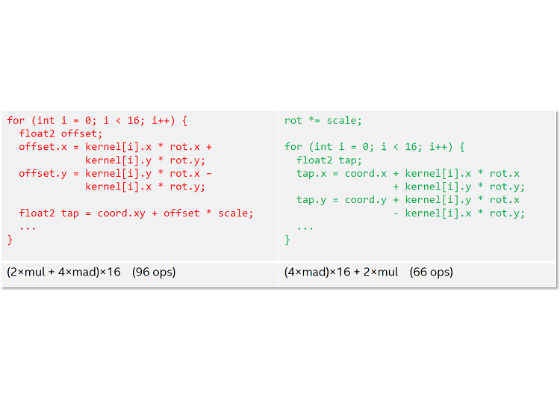
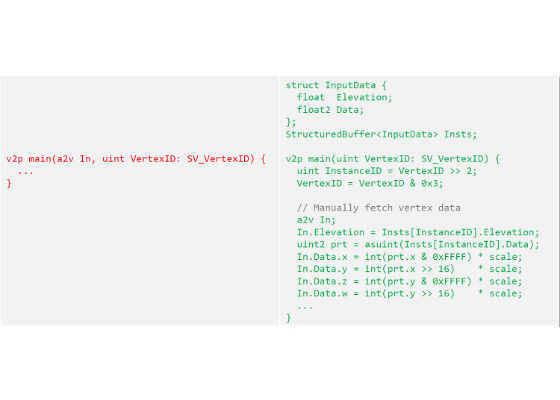
Figure 4 shows a “before and after” example from the code, along with the number of micro-ops generated by the compiler.
Figure 4. Code snippet showing before (left) and after (right) where the team pulled computations out of the loop, saving 30 operations.
In their 2016 GDC talk, Cohade and Persson noted that reducing the utilization of the ALU meant they were able to save about 2 ms (out of 6 ms). Persson also noted in one of his previous optimization talks that reducing the ALU utilization from 50% to 25% while still bound by something else probably doesn't improve performance; it lets the GPU run cooler, however, which can still be a big benefit.
Instancing and Tune-up for Foliage Meshes
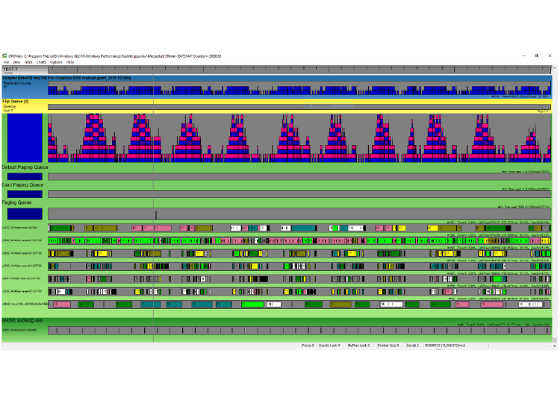
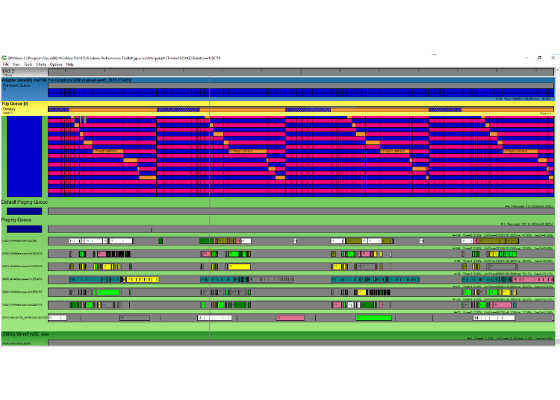
After completing some GPU optimizations, the team ran tests that revealed some scenes were now CPU limited. For example, in the GPU view screenshot below, you can see that one CPU thread is almost 100% active, while there are gaps in the GPU execution.
Figure 5. GPU gaps showing that the CPU became the main bottleneck for the current scene.
When the team found out that the CPU limit was due to the high number of draw calls, their next move was to try instancing. Instancing refers to simultaneously rendering multiple copies of the same mesh in a scene. Instancing is particularly helpful when creating foliage, which Just Cause 3 relies on heavily, but instancing also helps with characters and common objects.
By altering different parameters, such as color or skeletal pose, objects and foliage can be represented as repeated geometries without appearing unduly repetitive.
Implementing instancing did help significantly in the scenes that were CPU limited, as Figure 6 shows below. When compared to Figure 5, the CPU thread isn’t always active, which returned the team to the point where the GPU was the limiting factor (GPU queue always full).
Figure 6. Same section of the game after removing the CPU bottleneck.
In one case, for a tiny piece of foliage (4 vertices and 6 indices), with many instances, standard instancing resulted in poor wavefront occupancy. To solve this issue, the team decided to implement manual instancing. They repeated the geometry inside a larger index buffer, allowing the shader to manually fetch data to draw many copies of the trees at once. The amount of vertex data stayed the same.
The data was read from a texture to modify the trees and create multiple appearances, reducing redundancy. The result was a dramatic reduction in the number of draw calls, and a reduced number of buffer updates. The team calculated that calls took 2.4 ms before, and 0.7 ms after–a big improvement.
Figure 7. Example of changes from instancing to manual instancing.
Vegetation Optimizations: Stalls and Forest Layers
While optimizing for Intel Iris graphics, the team discovered that vegetation rendering seemed to take way too long, so they hit upon the idea of disabling stencil writes, changing the state within the Intel GPA Graphics Frame Analyzer and measuring the impact. They found that rendering speeds improved dramatically (up to 80% savings!) in some instances. The reason behind this is that on Intel hardware, writing in the stencil buffer prevents the hardware from using early-Z rejection, creating pipeline stalls, and starving the Execution Units.
Figure 8. The Graphics Frame Analyzer helped identify "stalls" where rendering seemed to take abnormally long.
Optimizing forest layers also proved to be a challenge. At the lowest level of detail (LOD), trees were rendered using a dense grid mesh, at 129×129 per patch, that has an alpha texture mapped onto it, with the forest silhouettes using the alpha texture to fill in the detail. Rendering this took up to 5 ms in some scenes. Disabling stencils also didn’t help.
The team found through the Intel GPA tool that they were vertex bound, so they looked at mesh optimizations. They added 65×65 and 33×33 LOD, resulting in a large reduction in total vertices shaded. There was a small visual difference, but at the highest settings, the visuals stayed identical to before.
In addition, the team pursued several shader optimizations. They added a simpler “no-fade” vertex shader, and they added pre-computations to “bake-in” scaling into the world matrix. They recalculated some constants, simplified some math, and measured a performance gain from 5.0 ms to 2.5 ms. They then revisited disabling stencil writes, and reduced their rendering time to 0.5 ms. This is a good example of checking after each fix in order to see if a new bottleneck is hiding behind another issue.
But they didn’t stop there–they also revisited their triangle strips, and cut the time down to 0.4 ms. In all, they achieved a performance gain of an order of magnitude, by resolutely chasing down every single opportunity.
Optimizing Shadows
Cascaded shadow maps (CSMs) are often used to combat perspective aliasing, a common problem in shadowing. The basic problem is that objects nearest the eye require a higher resolution than distant objects, so partitioning the shadow coverage into multiple maps allows for different resolutions. JC3 uses four sun shadow cascades in a scattered update pattern, updating only two cascades per frame, which saves many milliseconds. However, this cycle optimization caused problems when camera flipping, as the shadows pop in over a few frames.
To reduce popping, the outer shadow has been centered around the camera, instead of in front of it:
This technique forced Avalanche Studios to disable frustum culling, and to use a different cascade to increase shadow range. This cost more time in terms of culling and size, so they looked for an alternative approach. They didn’t find a technique that solved the problem, so they reverted back to their original approach, but this time they introduced a tweak consisting of forcing the outer cascade to be updated in the first frame after the camera flip:
The team also disabled cloud shadows for low shadow settings.
Terrain, and Other Tune-ups
To optimize the lush terrain in JC3, the team continuously developed the terrain system, and went from a coarse terrain scheme (with only three levels of detail) to a much finer patch system. This traded more draw calls for less off-screen wastage, and much finer LOD tweaking, saving from 1-2 ms, depending on the scene.
The team also looked at which dependencies existed between rendering passes, and they were careful to not add new ones, in order to be as efficient as possible. This allowed to find the 3 following optimizations:
1. Better culling of waterboxes, which saved a complete rendering pass when no water was visible.
2. Disabling the velocity pass when motion-blur and temporal anti-aliasing were disabled.
3. When they detected that screen-space reflection was enabled, they disabled a planar reflection pass.
The team also tried to remove as many “clears” as they could, and used the hardware’s fast clear path (0,0,0,0, or 1,1,1,1 when the clear color is not set up during the resource creation) for passes where clears were required.
Because PC hardware usually has a different CPU/GPU balance than consoles, the team investigated rebalancing the work between CPU and GPU, and moved some work back to the CPU. That led to shorter shading time, with more computations for the CPU, but also more efficiency.
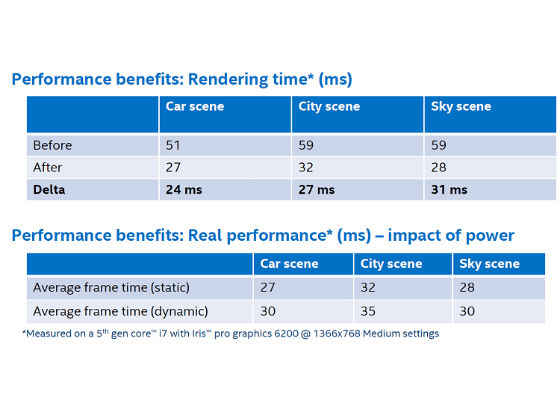
Figure 9. Performance gains before and after optimization.
Overall, the team doubled the performance of the title on Intel Iris graphics, using focused optimizations.
DirectX Features
In 2015, a wide range of new video cards came to market, with several launched to coincide with the new DirectX 12 (DX12) Application Programming Interface (API). These cards supported new features such asConservative Rasterization and Rasterizer Ordered Views.
Although designed for the DX12 API, these features were exposed in DX11.3, and thus available to Just Cause 3 engineers. Avalanche then adjusted their engine to match certain new features, which are exclusive to the PC version of the game. As 6thGeneration Intel Core graphics have full DX12 feature support, the team decided to use these–either for additional performance gains, or for graphical improvements.
At GDC 2015, Avalanche and Intel discussed the PC features implemented thanks to DX12, such as Order-Independent Transparency, and Conservative Rasterization for Light Assignment.
Conservative Rasterization for Light Assignment
Conservative rasterization is an alternative to “classic” rasterization, where the pixel is rasterized when the triangle covers the center of the pixel. Conservative rasterization means that all pixels that are at least partially covered by a rendered primitive are rasterized. This can be useful in a number of situations, including collision detection, occlusion culling, and visibility detection.
Avalanche Studios’ engine is a deferred renderer using clustered shading–as Persson presented in his 2013 Siggraph talk. Clustered shading has typically the same or better performance as traditional deferred renderers, and improves the worst case scenario, and solves the depth continuities issue that traditional deferred renderers have.
Much of the work here is referenced in Kevin Örtegren and Emil Persson’s GPU Pro 7 article and Örtegren’s master’s thesis, entitled “Clustered Shading: Assigning Arbitrarily Shaped Convex Light Volumes Using Conservative Rasterization,” published by the Blekinge Institute of Technology. Basically, this new approach involves replacing the light assignment pass traditionally done on the CPU, with a GPU version using conservative rasterization. This allows perfect clustering for different light shapes. The entire source code of the GPU Pro 7 article is posted on GitHub. The biggest difference between Örtegren’s thesis and the practical approach is to use a bitfield instead of a linked list, which is doable in JC3, as the maximum number of lights is known to be 256 per type. The bitfield approach has proven to be faster under heavy load, and only slightly slower under light load. Overall, the better light culling of the conservative rasterization approach brought an improvement of up to 30%.
Order Independent Transparency
Order Independent Transparency is an approach to solve one of the most fundamental challenges in real-time rendering, and has proven to be quite successful in a number of titles over the past few years. The topic has already been covered in detail, by Marco Salvi’s original approach, and Leigh Davies’ article on Grid 2.
Avalanche Studios’ engine traditionally used alpha testing for fast vegetation rendering, and the team saw an opportunity to improve the visual quality of the title even further by implementing a similar approach on JC3. The OIT code was integrated in the Avalanche engine in a few days, did not require any asset changes, and improved the quality of the vegetation rendering tremendously.
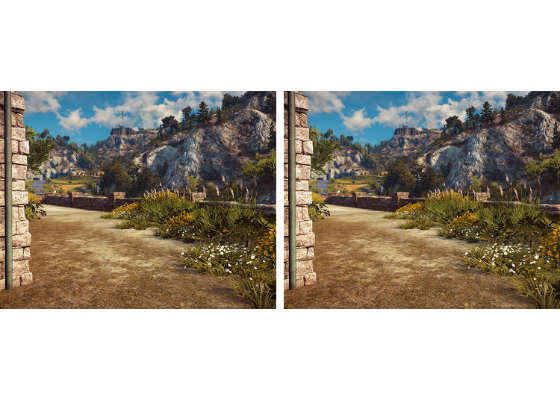
Figure 10. Two scenes from JC3, with no OIT (left) and using OIT (right).
As the approach has already been covered in detail in the above links, this article will describe the differences between the original and the Just Cause 3 approach:
- The original approach–using HDR–consisted of using one 32-bit buffer to store depth nodes, and another for color and alpha. HDR rendering could not be used in this case, however. This was solved by packing the eighth bit of alpha in the depth buffer, leaving the other buffer for a R11G11B10F HDR buffer.
- As an additional optimization, the team switched to using a Texture2DArray to store each node (instead of a structured buffer), which brought some performance benefit when using less than four AOIT nodes (JC3 uses two).
- With JC3 being an open world, with a lot of far vegetation, Intel and Avalanche engineers realized that Salvi’s approach would be extremely costly. In order to scale the performance from high-end PCs to mainstream systems with integrated graphics, the developers decided to add quality levels for the OIT, by simply using OIT on the first LOD at low settings, versus all levels of detail at high settings.
Conclusion
As a result of the collaboration between Intel and Avalanche, multiple optimizations throughout the rendering pipeline made laptop gameplay on systems with Intel Iris graphics almost on a par with leading platforms such as PS4* and Xbox* 1.
Many of the optimizations described here benefit not just systems with integrated graphics, but also high-end systems with discrete graphics cards. All systems benefit from better balancing CPU and GPU workloads, after all. Still, it’s exciting to open up a top title such as Just Cause 3 to a wider audience. Market share is expected to rise for mid-level and high-end mobile devices such as the Microsoft Surface Pro* 4, and the Intel® NUC kits should also offer interesting options for gamers. Code-named “Skull Canyon,” the NUC6i7KYK kit incorporates a very fast quad-core Intel Core i7 processor complete with Intel Iris Pro graphics. These mobile devices are inviting targets for game producers, and the optimizations described here will help reach those devices–no matter how demanding the graphics output.
For more such intel resources and tools from Intel on Game, please visit the Intel® Game Developer Zone
Source:https://software.intel.com/en-us/articles/optimizations-enhance-just-cause-3-on-systems-with-intel-iris-graphics

