
This document provides general overview of the Intel® System Studio for Microcontrollers, information how to use it for developing and debugging your applications for the Intel® QuarkTM microcontroller D1000 on Linux* platforms from the command line and from Eclipse* IDE, gives a list of compiler options and points to additional product information and technical support.
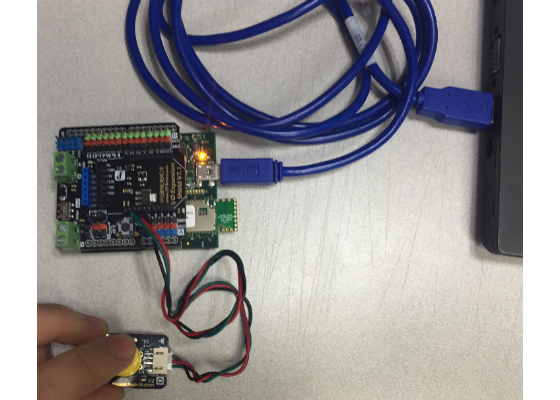
Intel® QuarkTM microcontroller D1000 requires only mini-usb connection for Flashing, GDB Debugging with OpenOCD connection, and UART communications.

< Introducing the Intel® System Studio for Microcontrollers >
Intel® System Studio for Microcontrollers is an integrated tool suite for developing and debugging systems and applications for the Intel® Quark™ microcontroller D1000 target – a configurable and fully synthesizable accelerator and microcontroller core (hereinafter is often referred to as “MCU”). Further in this document, we will refer to the Intel® System Studio for Microcontrollers as the “suite”, the “toolchain”, or the “toolset”.
The toolset consists of the following components:
- C/C++ LLVM-based compiler with MCU support including Linker, assembler, C/C++ Run-time libraries
- GDB Debugger with MCU support
- OpenOCD with MCU support
You can use the toolset from the command line and from the Eclipse* Luna, Mars IDE.
The toolset supports the following host operating systems:
- Linux* (Fedora* 19 and Ubuntu* 12.04 LTS and 14.04 LTS)
Installing the Intel® System Studio for Microcontrollers
Download the Intel® System Studio for Microcontrollers from the Intel Registration Center page.
Before installing the toolchain, make sure you have at least 140 Mb free space on your disk.
The name of the archive is:
– l_cembd_iqd_p_1.0.n.xxx.tgz (for Linux*)
where “n” is the “update release” number and “xxx” represents the package build number.
Install the toolchain by extracting the contents of the archive corresponding to your operating system
to a directory where you have the write access. Note that there is no default installation directory for the
toolchain. Make sure the installation directory does not have spaces.
Extract the contents of the archive to a directory where you have the write access, for example, your
$HOME directory. Use the following command:
tar –xzf l_cembd_iqd_p_1.0.0.001.tgz –C $HOME
In this example, your installation directory will be $HOME/l_cembd_iqd_p_1.0.n.xxx.
Installing a valid version of glibc
Make sure you have a valid version of the GNU C Library (glibc). Visit http://www.gnu.org/software/libc/ for installation.
For Fedora* it is glibc.i686. Execute the following command from a terminal as root:
yum install glibc.i686
For Ubuntu* it is ia32-libs. Execute the following command from a terminal as root:
apt-get install ia32-libs
Installing USB Driver
By default, non-root users do not have access to the JTAG pods connected via USB. You must grant write access to the proper /dev/bus/usb entry every time a device is connected to be able to run OpenOCD using a non-root account.
The process can be automated by adding an udev rule:
1. Create a text file in the rules directory:
sudo vim /etc/udev/rules.d/99-openocd.rules
2. Type the following content:
SUBSYSTEM=="usb", ATTR{idVendor}=="0403", ATTR{idProduct}=="6010",MODE="0666"
3. Unplug the device and plug again (or reboot the system)
Take these steps, otherwise, OpenOCD fails to run with an error message:
Error: libusb_open() failed with LIBUSB_ERROR_ACCESS
Error: no device found
Error: unable to open ftdi device with vid 0403, pid 6010, description '*'
and serial '*'
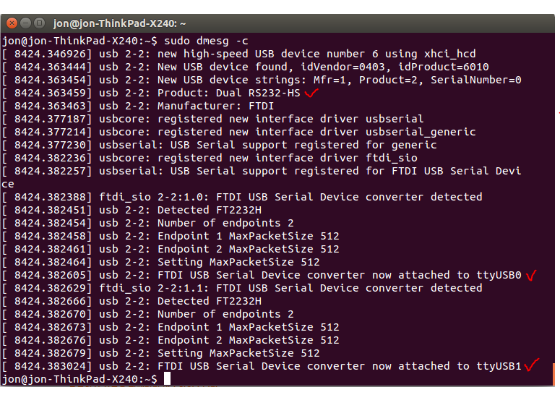
4. Check what exactly we can see after pluging in D1000 board after successful installation. Type 'sudo dmesg -c' and then plug in the board to your machine and then type 'sudo dmesg -c' once again.
Compiling The Project + Debugging The Project
Please refer the attached PDF user guide for the details.
FirmWare Example
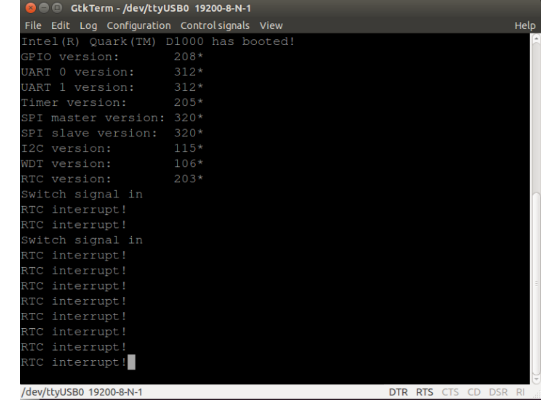
You can modify the firmware that comes with Intel System Studio for Microcontroller package. The below screenshot is a modified version of PushButton test from the firmware.
It detects a button push and prints out a string through the UART.
For more such intel IoT resources and tools from Intel, please visit the Intel® Developer Zone
Source: https://software.intel.com/en-us/articles/intel-system-studio-for-microcontrollers-getting-started/


