
Overview
In this guide you’ll setup network access to your Intel® Galileo Board and obtain an IP address through ethernet. Looking for the Wi-Fi* card setup? See Integrated Wi-Fi and Bluetooth card setup for the Intel® Galileo board
Requirements
- Intel Galileo Gen 2 board with power supply
- Micro B to Type A USB cable
- A 6 pin Serial to Type A USB cable (FTDI cable # TTL-232R-)
- Ethernet cable and router connection
Setup Hardware
1. Power on your board and plug in the Ethernet cable. The ethernet port should have a link light.
2. For the Intel Galileo Gen 2 board, connect the 6 pin Serial to Type A USB cable (FTDI cable # TTL-232R-).
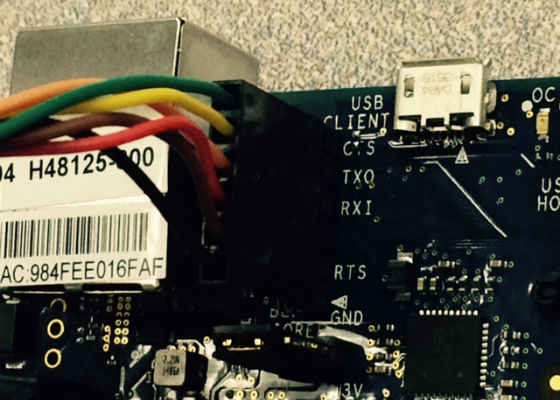
Figure 1. FTDI 6 pin cable, black wire towards bottom of picture correlates to GND.
3. Open Arduino or alternatively, connect with a terminal program, to your board.
4. Within Arduino, click on Tools -> Serial Monitor.

Figure 2. Serial monitor screen from within Arduino
5. At the bottom of the Serial Monitor set to Carriage return and 115200 baud rate.
6. In the top entry area, place your cursor in so it is blinking and hit Enter.
7. You should see a prompt. If the prompt begins with root, proceed to the next step, otherwise type in root and a password if necessary. By default there is no root password.
8. From the root prompt type in ‘ifconfig’ and hit Enter.
9. The left column defines the connection type, eth0 is the ethernet connection (see Figure 2)
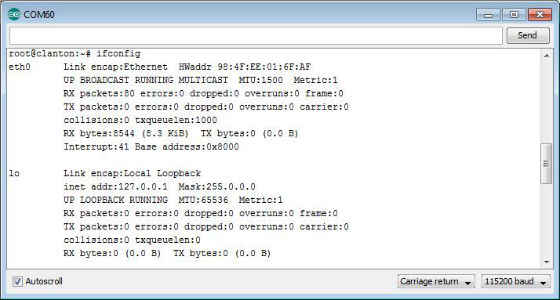
Figure 3. Look for your eth0 entry, if no inet addr showing use step 9.
10. If you do not see this entry, do the following command:
Enter ‘ifup eth0’
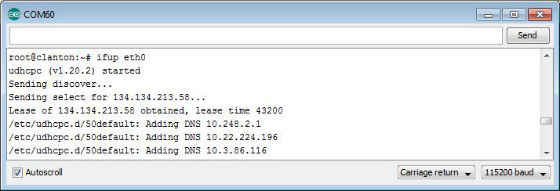
Figure 4. After issuing the ifup eth0 command you should see the network negotiate.
11. Enter in ifconfig again, if you see e look to see if an IP address is showing.
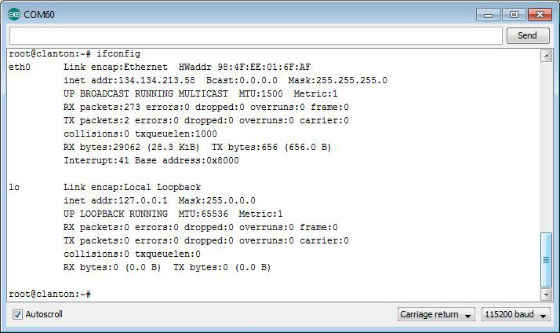
Figure 5. Look for the entry of inet addr: and take note of the IP address that follows.
12. To confirm the connection, you may want to take the IP address and open a web browser of a computer on the same network and enter the IP address into a web browser and hit enter. Alternately a ping test can be used.
For more such intel IoT resources and tools from Intel, please visit the Intel® Developer Zone
Source: https://software.intel.com/en-us/articles/intel-galileo-getting-started-ethernet/


