
Overview
This guide will teach you how to install the Arduino IDE and connect to your Intel® Edison or Intel® Galileo board on Windows* OS, Mac* OS X, or Linux* OS.
Requirements
- You must have assembled Intel Edison or Intel Galileo board. For steps, see the Getting Started Home page.
- (Windows only) Install the necessary drivers.
Choose your operating system
- Windows OS
- Mac OS X
- Linux OS
Install Arduino (Windows)
1. If you haven't already, install 7zip, a free archive utility that can be downloaded at: www.7zip.org.
2. Download the Arduino IDE.
3. Navigate to the folder where you downloaded the Arduino IDE .zip file.
4. Right-click on the .zip file, point to 7-zip, and select Extract to "arduino-…".

5. Open the extracted folder (Figure 2). You can move this folder wherever you want. A common place is to create a C:\Arduino folder. For this example, we will stick with the Downloads folder where it was extracted.
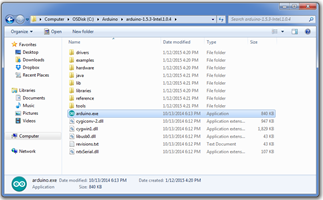
6. Double-click arduino.exe. The Arduino IDE opens.
Note: if you get a message asking if you want to visit the Arduino download page to update, select "No"

Now that you have installed the Arduino IDE, see
Blink example for Arduino IDE
for steps to run a sample application to blink an LED on your board.
Install Arduino (Mac OS X)
1. Download the Arduino IDE.
2. Navigate to the folder where you copied the Arduino IDE .zip file and double-click it to open the archive. This will unzip an application in the Downloads folder called Arduino.

3. Rename the Arduino file ArduinoEdison or ArduinoGalileo and move it intoApplications.

4. Double-click your renamed file and this window should open.

Note: if you get a message asking if you want to visit the Arduino download page to update, select "No"
Now that you have installed the Arduino IDE, see
Blink example for Arduino IDE
for steps to run a sample application to blink an LED on your board.
Install Arduino (Linux)
1. To check if you have Java installed, open a terminal and enter the command:
java

2. If you see the above message, you do not have Java installed and you will need to install it. To install the Java package, enter the command:
sudo apt-get install default.jre
You may be prompted to enter your user password.

3. Download the Arduino IDE for 64-bit or for 32-bit Linux. Newer versions of Linux will use a .txz rather than a .tgz file type.
4. Navigate to the folder where you copied the Arduino IDE .tgz or .txz file and double-click it to open the archive.
Note: to decompress from the command line use xz use
unxz IntelArduino-1.6.0-Linux64.txz
if you don't have xz installed, use
$ sudo apt-get install xz-utils
for Ubuntu or other debian-based machines
or
$ sudo yum install xz
Red Hat, Fedora, CentOS, or similar machines
5. Click Extract and navigate to the directory where you would like to unzip the Arduino IDE. In this example, we will leave it in the Download directory. Click Extract.
6. The extracted folder should contain a file named arduino, as well as several folders (Figure 8).

7. Open up a new Terminal window.
8. Navigate to the Arduino IDE folder. In in this example, the command will be cd Downloads/arduino-x.x.x/, where x.x.x is the Arduino IDE version number you downloaded.
Note: When you start typing in cd Downloads/arduino, you can press Tab to autocomplete the folder path.

9. To run Arduino with administrator privileges, enter the command:
sudo ./arduino.
If prompted, enter your password. The Arduino IDE opens.

10. With your board plugged in, check the availability of /ttyACM* port by entering
1 ls /dev/ttyACM*
in your terminal.
Note: If the /ttyACM* port is not available, here are several reasons why
- Modem manager is using the port. When the port becomes active, modem manager can claim the port, blocking the IDE's access to the port. The exact command to remove it will depend on your Linux distribution. For example, the command
1 sudo apt-get remove modemmanager
may work.
- The /ttyACM port was not created automatically when you plugged in your board. To add the port do the following:
a. Create a file etc/udev/rules.d/50-arduino.rules
b. Add the following to the file
1 KERNEL=="ttyACM[0-9]*", MODE="0666"
c. Restart the udev with the following command
view sourceprint?
1 sudo service udev restart
If you are using a virtual machine (VM), you may need to reboot Linux within the VM.
Note: if you get a message asking if you want to visit the Arduino download page to update, select "No"
Next Steps
Now that you have installed the Arduino IDE, see
Blink example for Arduino IDE
for steps to run a sample application to blink an LED on your board.
Troubleshooting
If you have any issues which you cannot resolve, see the Intel Edison Forums to post your questions and look for solutions.
For more such intel IoT resources and tools from Intel, please visit the Intel® Developer Zone
Source: https://software.intel.com/en-us/articles/install-arduino-ide-on-intel-iot-platforms/


