How to enable SoCWatch on Nexus (FUGU) player

For more detailed information coming from Intel Developer Forum 2015, go here:
 Survey
IDF2015 Lab Notes: Getting your Nexus Player from shrink-wrap to Performance and Energy Analysis
SoCWatch Introduction
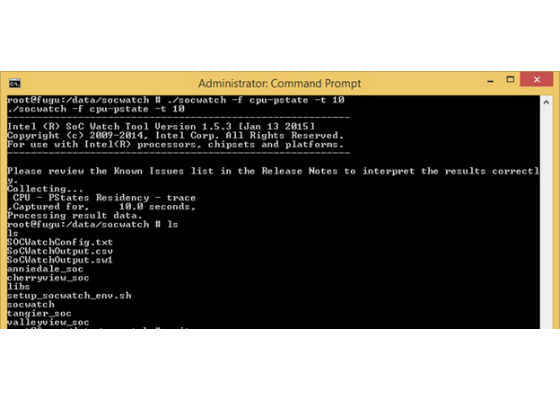
Intel® SoC Watch is a command line tool for monitoring system behaviors related to power consumption on Intel® architecture-based platforms. It monitors power states, frequencies, bus activity, wakeups, and various other metrics that provide insight into the system’s energy efficiency.
After data collection, a summary file and raw data are produced by default on target system. The raw data (sw1) can be import to Intel Energy Profiler which is the same GUI as VTune Amplifier to correlate and visualize the system behavior over time. The summary file (csv) can be opened by Excel and make difference metric into graph for easier analysis.
Grant root permission from Nexus player
Nexus player is already release to market. The analysis tool need to grant the root permission performance data through kernel driver. You can follow this video tutorial steps: Nexus Player – How to Root Android TV in order to grant root permission. Once you have root permission, the device can recognize the su command in adb shell.
Rebuild kernel and kernel configuration for Nexus player
Google disabled the module upload function in kernel configuration. For this reason, we need to download the kernel source from Google official website and rebuild the kernel only based on our customize config after modifying modify the kernel configuration.
Step1. Download the kernel source from Google official website
Step2. The kernel configuration must be configured with enabling the following options.
export ARCH=x86
make fugu_defconfig
make menuconfig
- CONFIG_MODULES=y
- CONFIG_MODULE_UNLOAD=y
- CONFIG_TRACEPOINTS=y
- CONFIG_FRAME_POINTER=y
- CONFIG_COMPAT=y
- CONFIG_TIMER_STATS=y
- CONFIG_X86_ACPI_CPUFREQ=m (or CONFIG_X86_ACPI_CPUFREQ=y)
- CONFIG_INTEL_IDLE=y
Step3. After build the kernel, the kernel file will be found under < INSTALLATION_DIR_PATH >\x86_64\arch\x86\boot\bzImage
1make –j4
Step4. Build boot image with pre-built kernel
For Intel platform device, sometimes only flash kernel partition will be failed. Therefore, we will build one boot image with our pre-built favorite kernel inside. For this purpose, we can put the pre-built kernel inside the Android source tree and build the boot image only.
For quick solution, we use the unpack/repack boot image script to build the boot image which is Android Image Kitchen. First you can download the factory image from Google developers. After use unpackimg.bat to extract the boot.img and the replace the < INSTALLATION_DIR_PATH >\split_img\boot.img-zImage with the bzImage you built before. At the end, using repackimg.bat to repack the new boot.img.
NOTE: Once your device can’t reboot anymore due to wrong flash instruction, you can plug off and on the power and long-press the hard key to make it run into fastboot mode. And then, using flash-all.bat script which is include in the factory image you download from Google developers to flash all images and recovery it.
Step5. Flash the new boot.img to the device.
adb reboot bootloader
fastboot flash boot boot.img
fastboot reboot
Now, you can check the kernel version to see if the flash is success or not. If so, we can start to build the SoCWatch driver based on this kernel source.
Build the SoCWatch driver
The driver source is included in SoCWatch package which you can download from Intel® System Studio. The SoCWatch is one of components in Intel® System Studio.
Step1. Build socperf1_2.ko via build driver script in < INSTALLATION_DIR_PATH >\soc_perf_driver\src\
sh ./build-driver
Step2. Build SOCWATCH1_5.ko via build driver script < INSTALLATION_DIR_PATH >\socwatch_driver\lxkernel\
sh ./build-driver –k <KERNEl_BUILD_DIR> -s <KERNEl_BUILD_DIR>
Setup SoCWatch environment
You can execute the installation file (socwatch_android_install.bat) after grant root permission via adb root command. However, we can’t easily make adb run in root default. For this situation, we set up the SoCWatch environment step by step.
First step is to navigate to the SoCWatch directory and copy the necessary files into device. For this device, we only can push those files to sdcard location and then copy to /data/socwatch
tools\os2unix.exe setup_socwatch_env.sh
tools\dos2unix.exe SOCWatchConfig.txt
adb push socwatch /sdcard/socwatch/
adb push setup_socwatch_env.sh /sdcard/socwatch/
adb push libs /sdcard/socwatch/libs/
adb push valleyview_soc /sdcard/socwatch/valleyview_soc/
adb push tangier_soc /sdcard/socwatch/tangier_soc/
adb push anniedale_soc /sdcard/socwatch/anniedale_soc/
adb push socperf1_2.ko /sdcard/socwatch/
adb push SOCWATCH1_5.ko /sdcard/socwatch/
adb shell
su
cp –r /sdcard/socwatch /data/
cd /data/socwatch
chmod 766 socwatch
At the end you can refer the User Guide (see in attachment) for instructions to collect data. Once you got your output data after the data collection, you can pull the result file and have insight/analysis the target system with collected performance data in the host system.
For more such Android resources and tools from Intel, please visit the Intel® Developer Zone
https://software.intel.com/en-us/articles/how-to-enable-socwatch-on-nexus-fugu-player
