Developing with Wind River Helix App Cloud
Developing with Wind River* Helix* App Cloud
The Internet affords us anywhere, anytime collaboration—the ability to work together to solve problems in novel and efficient ways. If you have Internet access and a web browser, Wind River* Helix* App Cloud gives you a feature-rich, integrated development environment (IDE) for embedded development and targeted debugging.
Developing in the cloud has three important advantages over local development:
- Your IDE is accessible anywhere you have access to a browser.
- Your IDE is stateful, maintaining its current state from the last time you accessed it.
- Your compilation executes in the cloud, making access from less-powerful devices (like thin clients) possible.
Testing your application in the cloud also has advantages:
- You can test your application on a range of hardware with a variety of configurations.
- You can test your application on virtual hardware using a standard debugger.
- You can test with your local hardware using images that Wind River Helix Lab Cloud provides.
You’ll find these capabilities in App Cloud, with integrated test support from Lab Cloud. You’ll see this functionality in action in this article, but a future article about Lab Cloud will provide more detail. Let’s look at how you can develop firmware with App Cloud and test with a single virtual device in Lab Cloud.
Working in Wind River* Helix* App Cloud
Developing firmware in App Cloud is surprisingly easy; it’s similar to local development, but offers cloud-based advantages. A simple development scenario demonstrates how the service works.
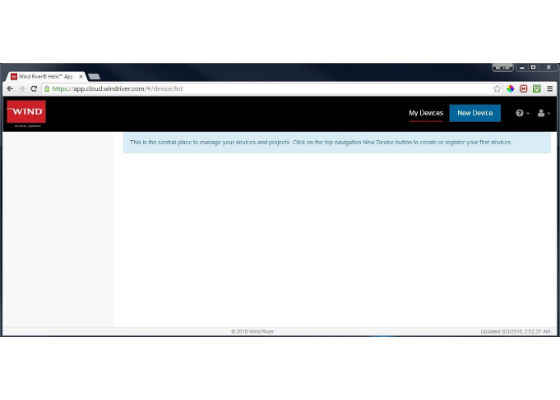
When you log in to App Cloud (https://app.cloud.windriver.com), you land on a page similar to the one Figure 1 shows. In this case, no projects or devices are available.
Figure 1. Logging in to Wind River* Helix* App Cloud [Source: Author-created image from App Cloud Screenshot.]
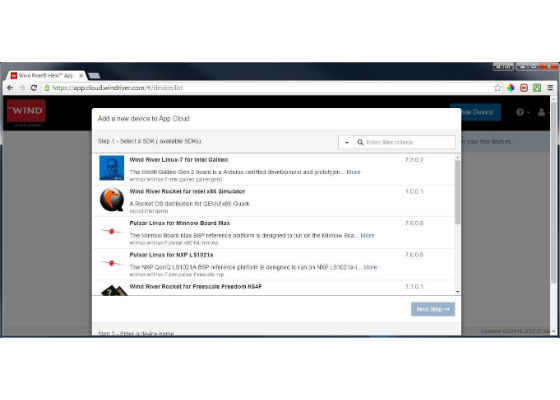
On this page, start by clicking New Device. This new device is the one you’ll use for testing in Lab Cloud. In the Add a new device to App Cloud dialog box (see Figure 2), I select Wind River Rocket for Intel x86 Simulator. This virtual platform emulates the x86 instruction set, and you can use it for development with the Wind River Rocket* real-time operating system (RTOS). Name your device TestDevice.
Figure 2. Creating a device for testing [Source: Author-created image from App Cloud screenshot]
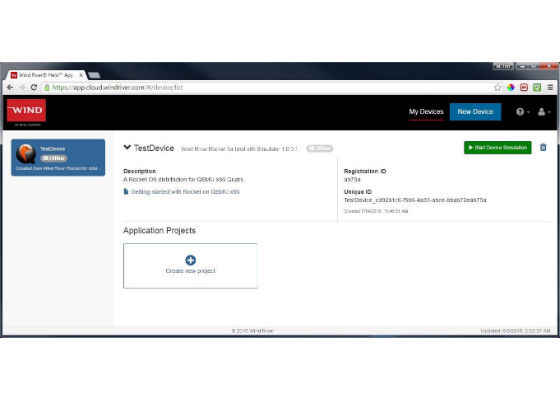
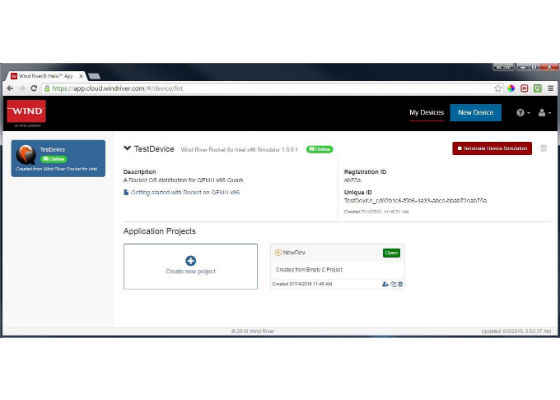
With TestDevice created, return to the projects page (see Figure 3), where a new blue box at the upper left identifies your new TestDevice, along with its status (Offline). You can also see device registration information on the right that’s unique to this device within Lab Cloud.
Figure 3. Device creation [Source: Author-created image from App Cloud screenshot]
Next, create a test project on your newly-created device:
1. Click Create new project (shown in Figure 3).
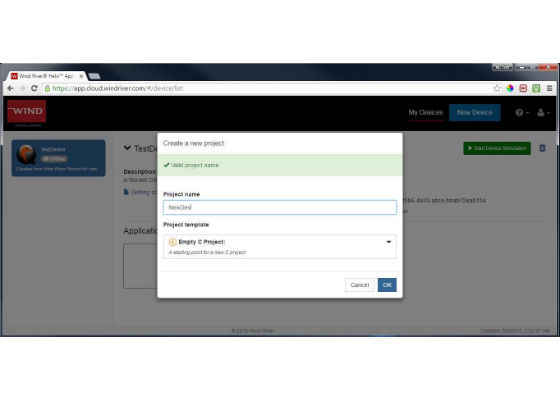
The Create a new project dialog box appears (see Figure 4).
Figure 4. Creating a new project [Source: Author-created image from App Cloud screenshot]
2. In the Project name box, type NewDev.
3. From the Project template drop-down list, select Empty C Project.
4. Click OK to create the project.
The App Cloud site is updated with the project information (bottom right).
5. Start the device by clicking Start Device Simulation.
Your TestDevice now appears as online (Figure 5).
Figure 5. Project creation [Source: Author-created image from App Cloud screenshot]
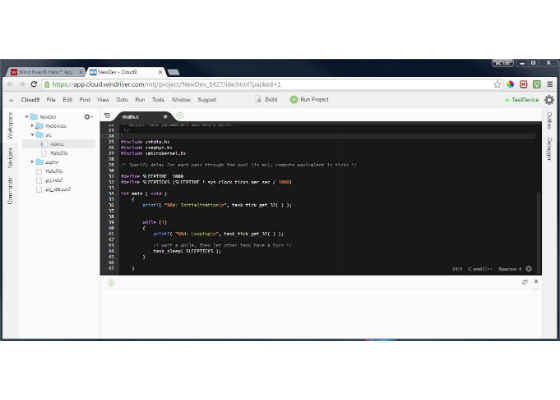
To begin development, click Open in the NewDev project to launch the IDE (shown in Figure 6). You can see a file list for the empty project on the left and a tabbed source window on the right. In the source window, you see the simple C program I created on GitHub*, which emits messages on a 1-second basis. It uses the Rocket task_tick_get_32 application programming interface (API) function to get the time in milliseconds (thetick rate). This task is implicitly within Rocket, so I use the task_sleep function to permit other tasks to execute.
Figure 6. Developing within the integrated development environment [Source: Author-created image from App Cloud screenshot]
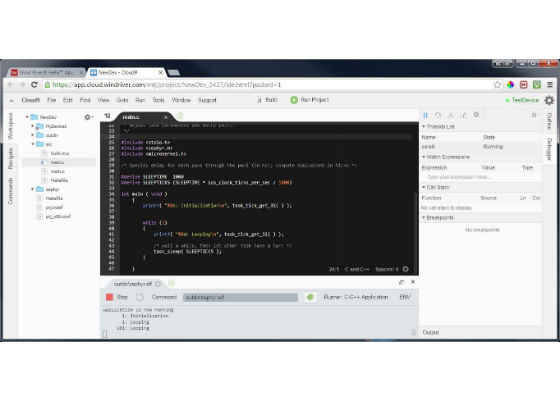
With the test program complete, click Run Project to build and download the resulting binary to TestDevice. The file is saved automatically, and Rocket is automatically built in. As you can see in Figure 7, the IDE has been updated to show an output window (build information and output from TestDevice) and a debugger window (on the right) that permits interactive symbolic debugging.
Figure 7. Executing DevTest on TestDevice [Source: Author-created image from App Cloud screenshot]
The output window shows the sample output (generated by the NewDev project on TestDevice). Within the debugger window, you can see that a single thread exists (called core0) that is executing. This task consists of the code provided in the main function.
In a matter of minutes, you were able to create a virtual test device and a code project to demonstrate build and execution. What makes this project all the more interesting is that if you exit the browser, and then come back later, the editor and IDE remain in the state where you left them, and the virtual device continues execution.
Enabling technologies of App Cloud
Back in Figure 6, in the file pane, you can see a folder named Zephyr. Zephyr* is the kernel for the Wind River* Rocket* RTOS, and provides many firmware APIs and services (a framework on which you can deploy your application). App Cloud includes integrated support for RTOS’s across the Internet of Things (IoT) device spectrum. Let’s look at some of the operating system options that you can take advantage of in App Cloud.
Wind River* Rocket*
Rocket* is a small, scalable RTOS that supports multiple architectures. It’s ideal for resource-constrained embedded systems. Rocket is configurable, and you can tailor it for optimal services and minimal size. Rocket was designed with the IoT in mind, and is an ideal platform for executing edge-device apps.
Wind River* Pulsar* Linux*
Wind River* Pulsar* Linux* is a high-performance Linux distribution that’s small, secure, and manageable. Pulsar is bundled with all the tools necessary for development (including toolchain) and is certified to run on all major CPU architectures. Simplifying development, Pulsar is fully integrated with App Cloud and Wind River* Helix* Device Cloud. Pulsar was also designed with the IoT in mind, and is an ideal platform for IoT gateway applications. (For more information, see What Is the Gateway and Why Should I Care?)
Wind River* Intelligent Device Platform
Wind River* Intelligent Device Platform is customizable middleware designed for execution on IoT gateways. It includes a range of services (some of which are accessible to your application) that cover the spectrum of IoT requirements, including built-in security features that cover device, data, and manageability features (with protocols such as Technical Report [TR] 069 and Open Mobile Alliance Device Management). You’ll also find native support for Wi-Fi*, ZigBee*, and other protocols, along with support for Message Queuing Telemetry Transport for data transportation. Intelligent Device Platform supplies the commonly required security and manageability elements for IoT gateway development, allowing you to focus on your application and value.
Summary
App Cloud by itself is an anywhere- , anytime-accessible IDE that you can use to develop IoT apps across the ecosystem of IoT devices. Its integration of Device Cloud and native support for world-class operating systems makes it an ideal environment for your IoT development needs.
For more such intel IoT resources and tools from Intel, please visit the Intel® Developer Zone
Source: https://software.intel.com/en-us/articles/developing-with-wind-river-helix-app-cloud

