
Intro
The Internet of Things (IoT) Cloud is currently moving down from the server farms to the Gateway to do computing at the edge. The amount of data generated by sensors every second is staggering, filtering that data at the edge before it goes to the cloud can reduce some of the noise, be more reliable, and keep information more secure. For example, autonomous cars cannot rely on the cloud to do the bulk of their processing. If communication between the car and the cloud is interrupted for a few seconds, it can cause an accident. Consequently, most of the autonomous driving logic processing needs to be done at the edge. In addition, some information being sent to the cloud could be sensitive or private information. Keeping that information at the edge instead of sending it up to the cloud shortens the transfer chain and gives hackers fewer opportunities to intercept the data. This article will explore counting people at the edge without the cloud. Counting people entering and leaving can be useful for retail stores, security monitoring, and a variety of other purposes.
Set-up
In this ‘Computing at the Edge’ project, the gateway uses Open Source Computer Vision* (OpenCV*) to analyze an Internet Protocol (IP) camera web stream to count the number of people crossing the frame. The webcam is a Logitech* C270, HD Webcam with 720p resolution. The camera plugs into the USB port of Intel® Edison development board which turns into an IP webcam streaming video to a website. The Intel® Edison development board keeps the camera separate from the gateway so the gateway can be placed somewhere more secure and make the camera’s footprint smaller. The Intel® IoT Gateway then captures images from the stream and uses OpenCV to analyze those images counting the number of people who have crossed the frame (or rather entered the store). The Gateway used is the Dell* Wyse 3030 thin client. However an Intel® Next Unit of Computing (Intel® Nuc) would also work or any similar gateway device. All the computing is done at the edge on the gateway, near-real-time and a livestream can be viewed to see the people being counted. The near-real-time aspect of this setup demonstrates the power of computing at the edge without relying on post processing in the cloud or having to save large video and image files.
For more information on the Intel® Edison module:
https://software.intel.com/en-us/iot/hardware/edison
The camera used:
This article builds upon the hardware and software setup of the previous article “Smarter Security Camera: A Proof of Concept (PoC) Using the Intel® IoT Gateway.” Refer there for instructions on the set-up of the Intel® Edison IP camera and installation of OpenCV on Wind River® Linux*.
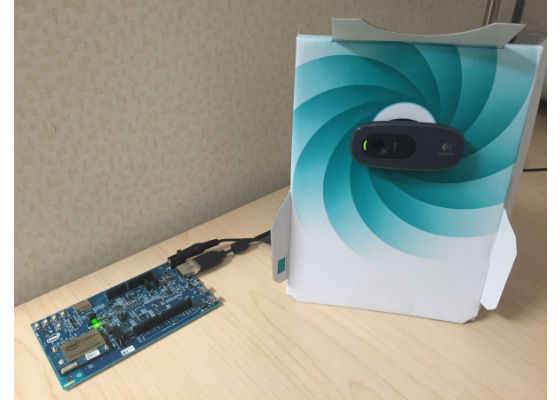
Figure 1: Intel® Edison Compute Module and Logitech* C270, HD Webcam setup

Figure 2: Intel® Gateway Device
Capturing the image
OpenCV* already has a built in method to capture video from a web stream. The only important note is the link must end in ‘.mjpg’ for the OpenCV call to work. While the .mjpeg-streamer’s default link doesn’t end in ‘.mjpg’, adding it to the link, as shown below, has no ill effects.
self.video = cv2.VideoCapture('http://<edison IP>:8080/?action=stream.mjpg')
As OpenCV captures images and analyzes them, the script feeds the analyzed images to another web stream for viewing on the gateway side. Image captures can be achieved using Flask*, a lightweight Python* micro web framework with streaming methods built in. The resulting web stream will be broadcast at:http://<gateway IP>:5000/. Flask can be installed on the gateway using the pip package manager with the command below:
pip install flask
To learn more about video streaming with Flask, visit this blog: https://blog.miguelgrinberg.com/post/video-streaming-with-flask
The code below is the main.py that has all the logic to use Flask. The video stream and processing is initialized using WebcamVideoStream().start() and each frame is read with vs.readDectections(). It is important to note the line “time.sleep(0.03)” below, this call keeps the frame changing at 30 frames per second. Without it the loop would cycle much faster which will build up a large buffer of images for Flask to display, effectively slowing the web stream to a crawl as it attempts to display every image sent.
#!/usr/bin/env python
from WebcamVideoStream import WebcamVideoStream
import cv2
import time
from flask import Flask, render_template, Response
app = Flask(__name__)
@app.route('/')
def index():
return render_template('index.html')
def gen(vs):
count = 1
while True:
frame = vs.readDetections()
count = count+1
yield (b'–frame\r\n'
b'Content-Type: image/jpeg\r\n\r\n' + frame + b'\r\n\r\n')
time.sleep(0.03)
@app.route('/video_feed')
def video_feed():
return Response(gen(WebcamVideoStream().start()),
mimetype='multipart/x-mixed-replace; boundary=frame')
if __name__ == '__main__':
app.run(host='0.0.0.0', debug=True)
Code 1: main.py
Flask also needs an html layout for what is going to be displayed. In the same folder as the main.py script, create a folder named ‘templates’ and create the index.html file for the web page layout using the following:
<html>
<head>
<title>Counting People</title>
</head>
<body>
<h1> Counting People</h1>
<img src="{{ url_for('video_feed') }}">
</body>
</html>
Code 2: template/intex.html file
So while the main.py class is pulling new frames as needed, there is another class WebcamVideoStream.py that is doing all the heavy lifting to analyze the image. WebcamVideoStream.py will use two separate threads to prepare the frames for the web stream which keeps the main thread in main.py free and unblocked. One thread is in charge of getting the most recent image from the IP webcam and drawing any detections on top of it. The second thread analyzes the frame for people detections and handles the people counting.
The first thread that keeps the current image (self.rawImage) up to date and draws on the frame is shown in the code below. It is important to use the line ‘img = self.rawImage.copy()’, otherwise the rawImage gets passed by reference instead of by value which results in the rawImage having text and rectangles drawn on it which the second analyzing thread will see and conclude are people.
def update(self):
# keep looping infinitely until the thread is stopped
count = 1
while True:
# if the thread indicator variable is set, stop the thread
if self.stopped:
return
# otherwise, read the next frame from the stream
(_, self.rawImage) = self.video.read()
img = self.rawImage.copy()
#draw rectangles around the people
draw_detections(img,self.contours)
#visually show the counters
cv2.putText(img, "Entered: " + str(entered) ,(10,20),cv2.FONT_HERSHEY_SIMPLEX,0.5,(255,255,255),2,cv2.LINE_AA)
cv2.putText(img, "Exited: " + str(exited) ,(10,50),cv2.FONT_HERSHEY_SIMPLEX,0.5,(255,255,255),2,cv2.LINE_AA)
ret, jpeg = cv2.imencode('.jpg', img)
self.frameDetections = jpeg.tobytes()
Code 3: Frame updating thread in the WebcamVideoStream.py class
The second thread, which preformes people detection, will be addressed in more detail in the People Detection and the People Counting sections.
People Detection
There are multiple ways to detect people in an image; several were tried to find the right approach for this paper’s purposes. Originally the HOG Descriptor People Detector Algorithm was used. However, HOG is limited by the angle it can detect people at as well as being much slower and inaccurate from frame to frame. So the approach was changed to look at each frame for differences to detect people.
Looking at each frame ensures movement is seen but limited by anything moving across the image will be counted as a person. For this reason the scene the camera is viewing needs to have the background as static as possible.
To find differences between two frames, MOG and absdiff methods were compared. MOG was found to be slower and had more artifacts (this resulted in false positive person right next to a real person). Processing time was compared during the code development and MOG’s range of computing time was 0.04 to 0.15 seconds while absdiff’s range was 0.003 to 0.017. For reference we need a frame every 0.03 seconds to hit 30 frames for second.
absdiff works by comparing the current frame to the first frame i.e., the empty background. The frames are first converted to grayscale, and then OpenCV algorithms can do the comparison to find the contours/areas of difference. To visually explain what happens during the comparison, Figure 3 shows an absdiff on the current frame versus the first frame.
frameDelta = cv2.absdiff(self.firstFrame, img)
Code 4: OpenCV absdiff call
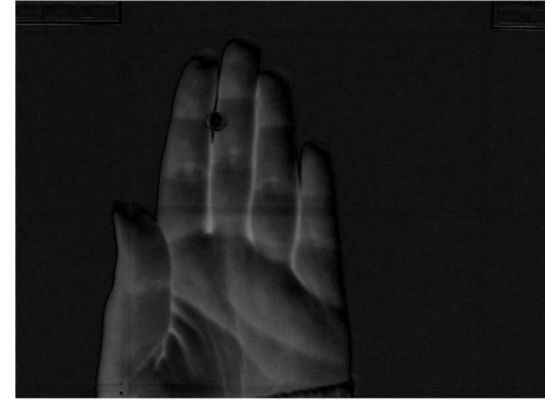
Figure 3: absdiff of initial blank frame and current frame with a hand
After the OpenCV threshold is applied, the frame differences are changed to white and the background to black, making the image binary. Refer to Figure 4 below.
thresh = cv2.threshold(frameDelta, 25, 255, cv2.THRESH_BINARY)[1]
Code 5: OpenCV threshold call
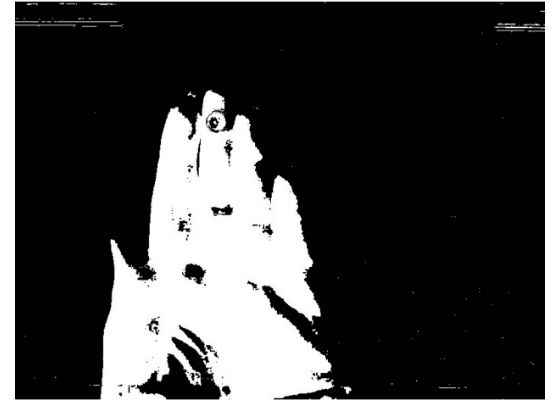
Figure 4: Frame after applying OpenCV threshold method
Then the contours (shapes) can be found easily and their coordinates used to draw rectangles over the original color image. Refer to Figure 5 below.
(_,allContours, _) = cv2.findContours(thresh.copy(), cv2.RETR_EXTERNAL,cv2.CHAIN_APPROX_SIMPLE)
(x, y, w, h) = cv2.boundingRect(allContours)
cv2.rectangle(self.rawImage,(x,y),(x+w,y+h),(255,0,0),2)
Code 6: OpenCV call to find contours and draw the contours as a rectangle
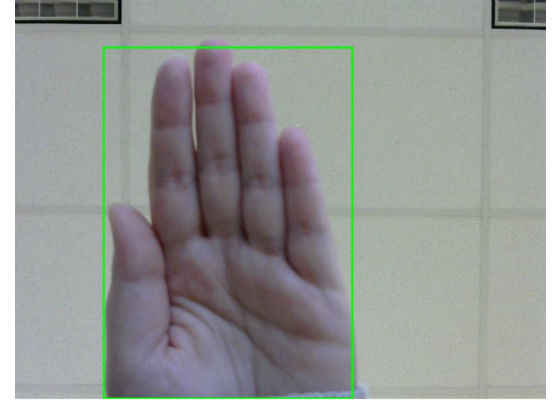
Figure 5: Frame after drawing found contours as a rectangle
After finding all the contours, it is also good to filter out the noise in the image and only look at contours above a set area size which must be calibrated to your setup.
personContours = []
for c in allContours:
# only look at contours larger than a certain size
if cv2.contourArea(c) > personSize:
personContours.append(cv2.boundingRect(c))
self.contours = personContours
Code 7: Code to filter out smaller contours
Putting all the above logic together, the second thread loops over the frames finding the contours, filtering out the ones that are too small, and sends the array of contours to the people_tracking method which is discussed in the next section ‘People Counting’.
def updateContours(self):
# keep looping infinitely until the thread is stopped
global personSize
while True:
# if the thread indicator variable is set, stop the thread
if self.stopped:
return
#get the current frame and look for people
total = datetime.datetime.now()
img = cv2.cvtColor(self.rawImage, cv2.COLOR_BGR2GRAY)
total = datetime.datetime.now()
frameDelta = cv2.absdiff(self.firstFrame, img)
ret, thresh = cv2.threshold(frameDelta, 25, 255, cv2.THRESH_BINARY)
(_, allContours, _) = cv2.findContours(thresh.copy(), cv2.RETR_EXTERNAL, cv2.CHAIN_APPROX_SIMPLE)
personContours = []
for c in allContours:
# only look at contours larger than a certain size
if cv2.contourArea(c) > personSize:
personContours.append(cv2.boundingRect(c))
self.contours = personContours
# track the people in the frame
self.analyze_people(self.contours)
Code 8: Second thread in WebcamVideoStream.py that handles the people tracking
People Counting
The basics of people counting in this project are a Person.py class to create people objects, a way to remove people once they are out of the frame, and checking to see if the person crossed the mid-point of the image.
The Person.py containing the Person class is fairly simple, seen below. It keeps track of the person’s id and the x and y coordinates of their center point.
class Person:
def __init__(self, id, x, y):
self.id = id
self.x = x
self.y = y
def getId(self):
return self.id
def getX(self):
return self.x
def getY(self):
return self.y
def updateCoords(self, newX, newY):
self.x = newX
self.y = newY
Code 9: People.py class
People also need to be aged out of the frame to prevent a buildup of people objects hanging around the edges and interfering with new people that enter the frame. To do this set up a range within the frame and once the person is outside of the range, delete them. The range can be thought of as two invisible lines, one on the left and one on the right.
self.w = self.video.get(3) #CV_CAP_PROP_FRAME_WIDTH
self.rangeLeft = int(1*(self.w/6))
self.rangeRight = int(5*(self.w/6))
Code 10: Snippet showing how to define an active range
Use a Boolean variable to see if the person is in the active zone which can be used later to remove the person out of the global person array.
inActiveZone= xCenter in range(self.rangeLeft,self.rangeRight)
Code 11: Snippet showing how to see if a point is within a range
Global variables for people include an array of all the active people, a person id number, and variables to keep track of the number of people who have entered or exited.
persons = []
pid = 1
entered = 0
exited = 0
Code 12: Global people variables in WebcamVideoStream.py
As the person walks across the frame, their position will need to be updated. If there are multiple people in the frame, they need to be updated with their cooresponding point and not another person’s point. This is done by caculating the distance between the current unknown person’s point with the list of known previous person’s points. If the distance between the two points is not greater than the person’s width or height divided by 2, it is assumed they are the same person. To track if a person has crossed the midpoint of the frame, compare the person’s current and previous point to see if they lie on either side of the midpoint.
def people_tracking(self, rects):
global pid
global entered
global exited
for x, y, w, h in rects:
new = True
xCenter = x + w/2
yCenter = y + h/2
inActiveZone= xCenter in range(self.rangeLeft,self.rangeRight)
for index, p in enumerate(persons):
dist = math.sqrt((xCenter – p.getX())**2 + (yCenter – p.getY())**2)
if dist <= w/2 and dist <= h/2:
if inActiveZone:
new = False
if p.getX() < self.midLine and xCenter >= self.midLine:
print("[INFO] person going left " + str(p.getId()))
entered += 1
if p.getX() > self.midLine and xCenter <= self.midLine:
print("[INFO] person going right " + str(p.getId()))
exited += 1
p.updateCoords(xCenter,yCenter)
break
else:
print("[INFO] person removed " + str(p.getId()))
persons.pop(index)
if new == True and inActiveZone:
print("[INFO] new person " + str(pid))
p = Person.Person(pid, xCenter, yCenter)
persons.append(p)
pid += 1
Code 13: People tracking method
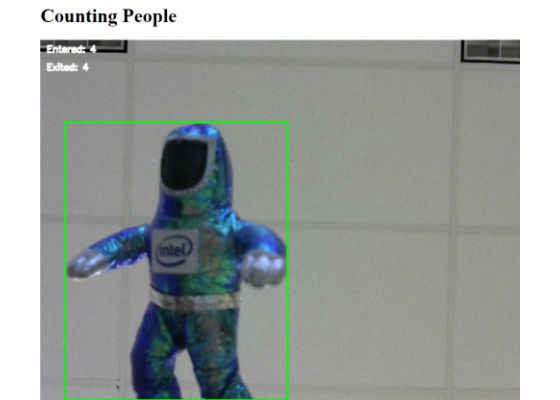
Figure 6: People counting stream showing person detected and number of people entered and exited the
from __future__ import print_function
from threading import Thread
import threading
import numpy as np
import cv2
import sys
import datetime
import time
import Person
import math
personSize = 6000
persons = []
pid = 1
entered = 0
exited = 0
def draw_detections(img, rects, thickness = 2):
for x, y, w, h in rects:
pad_w, pad_h = int(0.15*w), int(0.05*h)
cv2.rectangle(img, (x, y), (x+w, y+h), (0, 255, 0), thickness)
class WebcamVideoStream(object):
def __init__(self):
self.video = cv2.VideoCapture('http://192.168.1.175:8080/?action=stream.mjpg')
self.w = self.video.get(3) #CV_CAP_PROP_FRAME_WIDTH
self.h = self.video.get(4) #CV_CAP_PROP_FRAME_HEIGHT
self.rangeLeft = int(1*(self.w/6))
self.rangeRight = int(5*(self.w/6))
self.midLine = int(2.5*(self.w/6))
_, self.rawImage = self.video.read()
self.firstFrame = cv2.cvtColor(self.rawImage, cv2.COLOR_BGR2GRAY)
ret, jpeg = cv2.imencode('.jpg', self.rawImage)
self.frameDetections = jpeg.tobytes()
self.contours= []
# initialize the variable used to indicate if the thread should
# be stopped
self.stopped = False
def __del__(self):
self.video.release()
def start(self):
# start the thread to read frames from the video stream
t = Thread(target=self.update, args=())
t.daemon = True
t.start()
t2 = Thread(target=self.updateContours, args=())
t2.daemon = True
t2.start()
return self
def update(self):
# keep looping infinitely until the thread is stopped
count = 1
while True:
# if the thread indicator variable is set, stop the thread
if self.stopped:
return
# otherwise, read the next frame from the stream
(self.grabbed, self.rawImage) = self.video.read()
img = self.rawImage.copy()
#draw rectangles around the people
draw_detections(img,self.contours)
#visually show the counters
cv2.putText(img, "Entered: " + str(entered) ,(10,20),cv2.FONT_HERSHEY_SIMPLEX,0.5,(255,255,255),2,cv2.LINE_AA)
cv2.putText(img, "Exited: " + str(exited) ,(10,50),cv2.FONT_HERSHEY_SIMPLEX,0.5,(255,255,255),2,cv2.LINE_AA)
ret, jpeg = cv2.imencode('.jpg', img)
self.frameDetections = jpeg.tobytes()
def updateContours(self):
# keep looping infinitely until the thread is stopped
global personSize
while True:
# if the thread indicator variable is set, stop the thread
if self.stopped:
return
#get the current frame and look for people
total = datetime.datetime.now()
img = cv2.cvtColor(self.rawImage, cv2.COLOR_BGR2GRAY)
total = datetime.datetime.now()
frameDelta = cv2.absdiff(self.firstFrame, img)
ret, thresh = cv2.threshold(frameDelta, 25, 255, cv2.THRESH_BINARY)
(_, allContours, _) = cv2.findContours(thresh.copy(), cv2.RETR_EXTERNAL, cv2.CHAIN_APPROX_SIMPLE)
personContours = []
for c in allContours:
# only look at contours larger than a certain size
if cv2.contourArea(c) > personSize:
personContours.append(cv2.boundingRect(c))
self.contours = personContours
# track the people in the frame
self.people_tracking(self.contours)
def readDetections(self):
# return the frame with people detections
return self.frameDetections
def stop(self):
# indicate that the thread should be stopped
self.stopped = True
def people_tracking(self, rects):
global pid
global entered
global exited
for x, y, w, h in rects:
new = True
xCenter = x + w/2
yCenter = y + h/2
inActiveZone= xCenter in range(self.rangeLeft,self.rangeRight)
for index, p in enumerate(persons):
dist = math.sqrt((xCenter – p.getX())**2 + (yCenter – p.getY())**2)
if dist <= w/2 and dist <= h/2:
if inActiveZone:
new = False
if p.getX() < self.midLine and xCenter >= self.midLine:
print("[INFO] person going left " + str(p.getId()))
entered += 1
if p.getX() > self.midLine and xCenter <= self.midLine:
print("[INFO] person going right " + str(p.getId()))
exited += 1
p.updateCoords(xCenter,yCenter)
break
else:
print("[INFO] person removed " + str(p.getId()))
persons.pop(index)
if new == True and inActiveZone:
print("[INFO] new person " + str(pid))
p = Person.Person(pid, xCenter, yCenter)
persons.append(p)
pid += 1
Code 14: WebcamVideoStream.py
Summary
This concludes people counting at the edge using OpenCV. At this point, the people counted can be sent up to the Cloud to be stored and analyzed for patterns. The project framework with threads will support more complicated algorithms as well. If there is a need to run the code even faster, removing the visual webpage will speed it up. While the visual webpage is nice for debugging and as a visual reference, it is also relatively expensive in terms of computing time.
For more such intel IoT resources and tools from Intel, please visit the Intel® Developer Zone
Source: https://software.intel.com/en-us/articles/opencv-at-the-edge-counting-people


