 on Ubuntu under VMware")
Introduction
The Arduino 101* (branded Genuino 101* outside the U.S.) is a learning and development platform that uses a low-power Intel® Curie™ module powered by the Intel® Quark™ SE microcontroller. The Intel® Quark™ SE microcontroller contains a single core 32 MHz x86 (Intel® Quark™ processor core) and the 32 MHz Argonaut RISC Core (ARC)* EM processor. The Arduino 101* platform runs on Windows, Macintosh OSX, and Linux operating systems. This guide demonstrates how to run the Arduino 101* platform on Ubuntu using a VMware* Workstation. The VMware* Workstation is a virtual machine that allows you to run applications from other OSes in Linux from the desktop.
Hardware components
The hardware components used in this project are listed below:
- Arduino 101* module
- A standard A plug to B plug USB cable
Setting up VMware* workstation on Ubuntu*
Go to the VMware website to download and install the latest VMware workstation player for Windows. Then go to the Ubuntu* website and download the latest version of Ubuntu Desktop.
Open VMware and create a new virtual machine using the downloaded Ubuntu image.
Development board download
Visit https://www.arduino.cc/en/Main/Software to download the Arduino Software IDE version 1.6.7 or later for Linux. As of this writing, the latest Linux Arduino IDE version supported by Arduino 101 isarduino-1.6.11-linux64.tar.xz.
Copy arduino-1.6.11-linux64.tar.xz to the Ubuntu folder in the VMWare environment.
Set up the environment for Arduino 101*
Untar arduino-1.6.11-linux64.tar.xz and install the Arduino IDE software.
sudo apt-get update
tar -xvf arduino-1.6.9-linux64.tar.xz
sudo mv arduino-1.6.9 /opt
cd /opt/arduino-1.6.9
~/install.sh
Bring up Arduino on Ubuntu*
1. Connect the Arduino 101 platform to the virtual machine that is running the VMWare workstation.
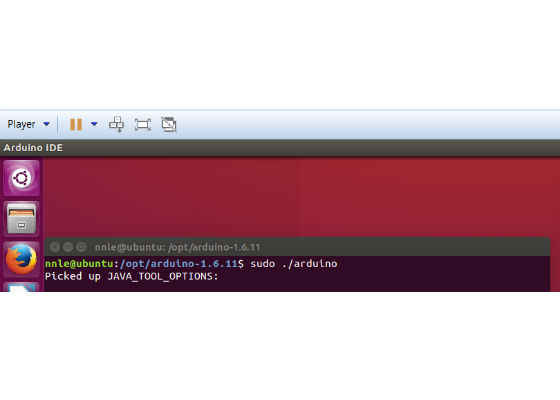
Figure 1: Bringing up the Arduino IDE* on the Ubuntu* command line
2. Choose Tools > Board > Boards Manager to launch the board manager to install the Intel® Curie board.
cd /opt/arduino-1.6.11
sudo ./arduino
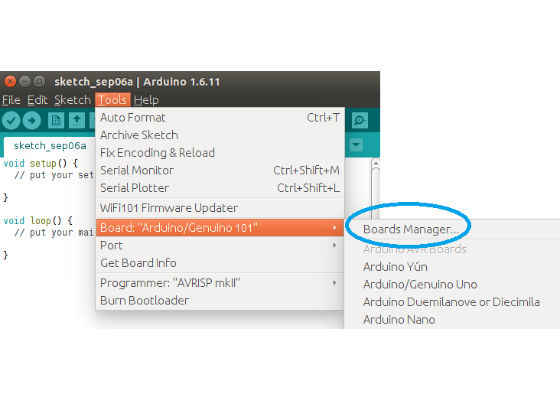
Figure 2: Launching the Boards Manager

Figure 3: Installing Intel® Curie boards
3. Choose Tools > Port and select the Arduino 101 port.

Figure 4: Selecting the Arduino 101* port
4. Choose Tools > Board and select the Arduino 101 board.

Figure 5: Selecting the Arduino 101* board
5. Choose File > Examples > Basics > Blink and open the blink sketch.

Figure 6: Uploading the Blink sketch
The LED on the Arduino 101 platform should now blink.

Figure 7: Arduino 101* with LED Blinking
Arduino 101* Libraries
The Arduino 101* Libraries are a collection of code that provide extra functionality for sketches. They make it easy to connect to Bluetooth LE, sensors, and timers. To experiment with the built-in Arduino 101 libraries, visit https://www.arduino.cc/en/Guide/Libraries. The Arduino 101 libraries are based on the open source corelibs. If you are interested in experimenting the corelibs, visit 01.org’s GitHub*, but these are not required to use the Arduino 101 libraries.
For more such intel IoT resources and tools from Intel, please visit the Intel® Developer Zone
Source:https://software.intel.com/en-us/articles/bring-up-arduino-101-branded-genuino-101-outside-the-us-on-ubuntu-under-vmware


